We found this tip from one of Bikram Yoga Canberra's teachers Rowena on being mindful of how far to push your hips during camel pose. You can find their Facebook page by clicking "here".
Utstrasana (Camel Pose) is a great posture for the reproductive system, spine and chakras. The technique here, however, needs to be tweaked a little!
In Camel we are informed to push our hips forward...(often to remind beginners to actually PUSH!) However, too
good is no good! In the image of the guy in this pic.. you can see his
total spine isn't backward bending.. he is pushing his hips too far
forward resulting in more of a lower back workout.
How to
correct it.. Push the hips less forward and instead focus on lifting the
chest higher in order to access the upper spine to a greater degree.
Happy Camel...
Thursday, July 31, 2014
Thursday, July 17, 2014
Tip of the Week: Stay Hydrated This Summer
With summer really heating up, it's important to stay hydrated, especially when practicing Bikram yoga. Here is some great advice from MindBodyGreen, originally posted on our blog (here).
How can you tell if a student is not properly hydrated in class?
When
a student is having a hard time in general, this can be a sign of
dehydration and/or loss of electrolytes. Signs are: tiredness,
dizziness, they’re not sweating enough, and /or their muscles are
cramping.
If
you are properly hydrated, and have an empty stomach (not especially
full of toxins that day), the class should not be a huge struggle. Many
people need to take a few classes for their bodies to acclimate to the
heat, but if every class continues to be hard, talk to one of your
teachers. Together you can trouble shoot and find out what's going on.
Usually it's a simple solution.
What
would you recommend to a hot yoga student in terms of replenishment if
they are only hydrating with water during a summer practice?
If you’re practicing hot yoga, like the Bikram series, you cannot properly hydrate with just water, especially in the summer.
Electrolytes
are charged molecules (positive or negative) that become active in
water. They conduct electricity in the body and are instrumental for
transmitting signals. They regulate, among other things: muscle
contraction, heart rate, balance of body fluid, and pH levels. They affect all organs and systems in the body.
The
body needs the right balance of water AND electrolytes for
communication signals to be sent throughout the body. For example, if
you are depleted in sodium or potassium, the signal from the nervous
system cannot reach the muscle cell. This results in muscle cramping.
It's
not just sodium and potassium we need. Other essential electrolytes
include: magnesium, chloride, phosphate, sulphate, and calcium ions and
bi-carbonates.
There
are many sports drinks out there, and which one to consume is a
personal decision. Personally, I am not a big fan of them for the
following reasons:
- Sports drinks often have too much sodium and sugar. In an extreme emergency, they will help. As a regular source of hydration, they are not the best.
- The more processed a drink is, the less efficient the electrolytes become.
- Exposure to air and UV rays (including sunlight) diminish electrolyte activity. Heavily processed drinks in clear bottles are not the best source of electrolytes.
I
recommend coconut water – it cannot be beat. In fact, coconut juice is
so similar to human blood that in WW2 they used it in blood
transfusions for wounded soldiers! It is nature's miracle. Try to pick
one that is not from concentrate, and if possible not pasteurized (there
are brands now that use pressurizing technique to kill bacteria. This
keeps active molecules more intact.)
There
are other good sources of electroytes: Emergen-C, Ultima Replenisher,
and mineral drops - to name a few. There are lots of options available
at health food sport supplement stores. When using these, do not let
them sit too long in your water or let them get too hot in the room.
I recently read the following on active.com:
“Drink by schedule, not by thirst. If you feel thirsty you are already
dehydrated.” Is there truth to this statement? What about the old adage:
drink when you’re thirsty?
It
is hard to say exactly how much a person should drink; everyone is
different in terms of activity level, and how much a person sweats.
Generally speaking, the average person loses approx. 2 liters of water a
day through breath, moderate sweating, and urination. A good rule: body
weight X 0.7 = # ounces one should drink a day, on average.
If
you are practicing Bikram, especially on a consistent basis, this HAS
to be more. The more water you drink, and the more you sweat, the more
important it is to replenish your electrolytes!
I
would suggest starting off by drinking on a schedule. Most of us are
dehydrated and have become acclimated to feeling this way. We’re not
attuned to feelings of thirst. In fact, many people mistake the feeling
of thirst for hunger, so we eat instead of drinking water.
Until
you have put your body back on track and established a pattern for
being hydrated, I recommend discipline with water consumption.
What should we include in our food diet to help along hydration?
Foods high in water: fruit and veggies, especially. Avoid caffeine (try decaf!), alcohol, and starches as they are dehydrating.
How should a student pace themselves with liquids in a 90 minute hot yoga class?
It
is best to come into the room already hydrated. Do not try to hydrate
in the room! It takes about 45 minutes to process water. Ideally, water
in the room should be for refreshment. If you’re practicing Bikram Yoga,
you should not need more water than little sips in between every 3 or
4 postures. Having a full belly of water is uncomfortable.
Thursday, July 10, 2014
Tip of the Week: Breathing Guide for Standing Series
One of the first things you’ll hear during a typical yoga class is… breathe. Breath is one of the fundamental tools in any yoga or meditation practice. The simple act of focusing on your breath can improve your mental and physical health. Below are some breathing tricks for a few postures that will help improve your
Bikram yoga practice, specifically the standing series, from Lindsay Dahl at lindsaydahl.com.
Since this posture is at the end of the warm up series, it’s particularly important to maintain your breath so you can glide into the standing series without feeling fatigued.
Second, take another deep relaxed breath before pulling your arms down to the sides of your legs (the third part of the posture). These two breaths have been the key to surviving and maintaining my Standing Head to Knee pose.
Standing Bow
Similar to my Mary’s suggestion for Standing Head to Knee, try taking a big, dramatic breath and stretch your body and chin toward the ceiling before you start kicking you leg. This large breath will help sustain you through the posture and will give you the confidence to nail the pose for the full 60 seconds.
Eagle Pose
Eagle pose is one of the easiest postures to restrict or stop breathing all together. For this posture be extra mindful of maintaining a low, unrestricted breath throughout the length of the whole posture. Having your arms twisted across your chest and squatting like you’re in a public bathroom, no wonder it’s easy to stop breathing.
Since this posture is at the end of the warm up series, it’s particularly important to maintain your breath so you can glide into the standing series without feeling fatigued.
Standing Head to Knee
I have two thoughts on using the breath in this posture. I learned these tips from Mary Jarvis, a long time Bikram teacher. She advises students to inhale deeply when extending your leg out in the second part of the posture (kicking your leg out). This allows your lungs to fill with oxygen. Similar to the spine strengthening series, once you have this full deep breath, breath slowly and normally.
Second, take another deep relaxed breath before pulling your arms down to the sides of your legs (the third part of the posture). These two breaths have been the key to surviving and maintaining my Standing Head to Knee pose.
Standing Bow
Similar to my Mary’s suggestion for Standing Head to Knee, try taking a big, dramatic breath and stretch your body and chin toward the ceiling before you start kicking you leg. This large breath will help sustain you through the posture and will give you the confidence to nail the pose for the full 60 seconds.
Standing Separate Leg Stretching/Toe Stand
When coming out of Standing Separate Leg Stretching and Toe Stand pose, I have a tendency to get light headed or dizzy. My teacher and friend Martha Williams from Bikram Yoga Minneapolis taught me to take a deep breath as I exit both of those postures. The deep inhale as you rise both helps you pull in your stomach (necessary for a safe exist) as well as provides enough oxygen to avoid feeling dizzy.
Standing Separate Leg Head to Knee
Take a deep breath while stretching up to the ceiling before you tuck your chin to your chest and roll up like a sushi roll; this will dramatically help with the execution of Standing Separate Leg Head to Knee pose. The breath before entering this posture has less to do with oxygen intake and more to do with setting up the posture correctly. By taking this deep breath and compressing your lower abdomen, you can begin the proper compression as you roll down to put your forehead on the knee. And yes, the extra oxygen helps you glide through the standing series!
Savasana
Here’s an unconventional breathing tip for savasana: relax your groin. It’s easy to settle in for a two minute savasana, and not even think about relaxing your groin and pelvic floor. By relaxing this area, your breath will naturally relax and slow down.
Thursday, July 3, 2014
Tip of the Week: Yoga Therapy for Your Knees
With a simple anatomy lesson, isometric exercises, and attention to alignment in standing poses, you can undo chronic pain in your knees. The following article is by Doug Keller from yogainternational.com.
If you have chronic pain in your knees, if they “snap, crackle, and pop” when you bend or extend them, or if they tend to hyperextend, you may have improper tracking or “dislocation” of the kneecap. This misalignment causes the most common kind of chronic knee pain and damage to the knee joint, which develop slowly over time.
Here’s a simple anatomy lesson: The kneecap is designed to slide along a groove in the femur, and it has to move smoothly within that groove to do its job well. If it goes “off track” (and it often does), it grinds away at the cartilage underneath and destabilizes the knee. The ensuing wear and tear is a key reason for knee replacement surgery, which a lot of people believe is necessary because they think the cartilage is “gone.” But the truth is that cartilage can grow back, albeit slowly. The main problem is that if we don’t correct the imbalanced pull of muscles on the kneecap, we will continue to grind our cartilage down faster than our body can replenish it.If you want to keep the knee healthy you need to strengthen the vastus medialis (the inner quadriceps). In fact, physical therapists consider exercises that strengthen this neglected muscle key in the rehabilitation of knee injuries.So why does the kneecap go off track? The cause lies mainly in the quadriceps, a group of four muscles that merge just above the knee into a single quadriceps tendon. This tendon surrounds and attaches to the kneecap, continuing down below the kneecap as the patellar ligament, where it attaches to the tibia (shin bone). The kneecap serves an important mechanical function. The quadriceps tendon passes over the kneecap like a rope over a pulley, and the kneecap—like a pulley—increases the strength of the quadriceps to straighten the leg by 30 percent. Together, the quadriceps and the kneecap form the “extensor mechanism” for straightening the leg. Misalignments come when the “rope” of the quadriceps exerts a sideways pull on the kneecap “pulley,” creating friction in the mechanism.
Hatha yoga has a lot to offer to correct this misalignment; the standing poses are especially effective. But be forewarned: Misalignments of the knee in various asanas can amplify the imbalances that lead to injury and can aggravate existing problems instead of correcting them. The good news is that good alignment and proper tracking are easy to achieve—once you know what to pay attention to.
Why Are We Prone to Knee Problems?
Our bodies are predisposed to injuries of the extensor mechanism because the hip joints are wider than the knees in a neutral standing position. The natural Y-shaped configuration to the leg bones promotes uneven contraction of the quadriceps, and problems such as hyperextension of the knees make these natural imbalances even worse. As a result, when we contract the quadriceps to straighten the leg, the unevenness of the contraction tends to pull the kneecap to the outside, thanks to the greater pull of the outermost quadriceps (the vastus lateralis).The innermost quadriceps (the vastus medialis) is most responsible for counteracting this pull. This muscle tends to be weak and underused, while the outer thigh muscle tends to be stronger from overuse. So if you want to keep the knee healthy (i.e., tracking properly in its femoral groove), you need to learn to strengthen the vastus medialis. In fact, physical therapists consider exercises to strengthen this neglected muscle key in the rehabilitation of knee injuries.
Structural misalignments tend to limit the vastus medialis' proper functioning--and can even weaken it in relation to the other quadriceps muscles, making it even harder to work with.
The Challenge of Working with the Inner Quad
Yoga students are often told to “lift the kneecaps” in straight-legged poses to engage their quadriceps and, ostensibly, protect their knees from hyperextension. But lifting the kneecaps in a healthy and balanced way requires focused attention, especially if you already have problems in your knees.This is easy enough to check. Sit or stand with your legs straight and your feet parallel to each other, then engage your thigh muscles so that your kneecaps “lift” or pull toward your hips. Do your kneecaps move up in a straight line, or do they move in an angle toward the outside of your knees? If the latter is the case, then you need to strengthen the vastus medialis, the inner quad, and learn how to use it properly.
This has its challenges. First, it can be difficult to find and isolate this muscle, because you can feel the vastus medialis firming most only in the last 10 to 20 degrees of knee extension. So it takes focused attention to even feel and understand what the muscle does.
Second, structural misalignments that cannot be changed (like being knock-kneed or bowlegged) tend to limit the vastus medialis’s proper functioning—and can even weaken it in relation to the other quadriceps muscles, making it even harder to work with.
Finally, although engaging the vastus medialis properly can prevent hyperextension of the knee, doing so is essentially useless if the knee is already hyperextended. Consequently, it’s important to consciously avoid hyperextension in the first place, rather than relying on the strengthening exercises to prevent it. This is critical, because the habit of hyperextension will otherwise pull you right back into your imbalanced patterns of knee extension even after you do the work of strengthening the vastus medialis.
Here’s what you can do to keep your kneecaps tracking properly:
- Find your vastus medialis, the inner quadriceps muscle.
- Strengthen it with small extension exercises.
- Continue to strengthen the vastus medialis in bent-knee warrior poses.
- Incorporate that work into straight-legged asanas.
How to Strengthen Your Inner Quad
Isometric extensions will help you identify the inner quad and its action as you strengthen it. To do this, sit in dandasana (staff pose) with your legs extended forward. Support your upper back against a wall if that’s more comfortable. Roll up a small blanket or sticky mat and place it under your knees to prevent hyperextension while your quadriceps are contracted. Next, rotate your right leg out 10 to 15 degrees (if the sole of your foot were on a clock face, your toes would be pointing to one o’clock).To find the vastus medialis, place your fingers about one inch above the inner (or medial) corner of your kneecap, and then walk your fingers about one and a half inches toward the inner thigh. Straighten your leg slowly to feel the quadriceps engage. You’re looking in particular for the firming of the teardrop-shaped muscle just under your fingers. This is the vastus medialis, the inner quadriceps. You will feel it fully engage as your leg straightens completely. Hold the contraction for 8 to 10 seconds, then release. Repeat this for two more rounds, making sure you don’t extend the leg so hard that you feel locking or pinching in the knee. Repeat this exercise with the left leg.
Next, do the same exercise without rotating the leg out. Keep your leg aligned so that your kneecap faces straight up toward the ceiling. Extend your leg fully and see if you can engage the inner part of the quadriceps—where you’re touching with your fingers—as strongly as you can engage the outer part of the quadriceps. Watch how your kneecap moves in a straight line along the center of the knee joint when your quads are engaged in a balanced way, rather than pulling to the outside. Repeat on the other leg. You can do these exercises several times a day—just be careful not to fatigue the muscle by doing too many sets at a time.
The Warrior Poses
Among the traditional asanas, the warrior poses (virabhadrasana I and II), in which the front leg is bent and the back leg is straight, are particularly effective for strengthening the vastus medialis, if done with proper alignment and action. Because although it’s easiest to isolate this muscle’s action when the leg is fully extended, it is also engaged and strengthened when the knee is bent at a 90 degree angle and the leg is bearing weight—as long as the knee is positioned vertically over the heel and the inner heel remains grounded. This is the case in a well-aligned warrior pose.
To come into the pose, step your feet wide apart, while extending your arms out to either side. Your feet should be roughly beneath your wrists. Turn your left foot in about 30 degrees and your right leg out 90 degrees. Keep your torso upright as you bend your right knee. Make sure your knee does not go beyond your ankle and toes: Keep the shin vertical while striving to bring the thigh parallel to the floor, so the leg is bent at a right angle. If the knee goes beyond your ankle and your weight shifts into your toes, widen the distance between your feet. Turn your head to look out over your right fingertips.
Even when your stance is the proper width and your knee bends to a right angle, a common—and harmful—misalignment is to let the thigh turn inward so that the knee points more toward the big toe. This happens especially when the arch of the foot collapses, which places stress on the inner knee and prevents you from strengthening the quadriceps in a balanced way. A less common misalignment is to shift the weight to the outer edge of the foot, so that the knee turns more toward the little toe. In this case the muscles along the outer thigh tighten, and the outer (lateral) side of the knee is stressed. In this case, too, the vastus medialis doesn’t function properly.
TO PROTECT THE KNEE make sure it’s above the second toe and that both the toe and the knee are on the same plane as the sit bone. If the vastus medialis is not properly engaged the knee falls inward. The vastus laterialis then pulls the kneecap outward, stressing the inner knee. When the weight shifts to the lower heel, the knee splays out over the little toes and stresses the inner knee.
Proper alignment in the warrior pose allows the vastus medialis to work in harmony with the other quadriceps to align and strengthen the extensor mechanism of the knee. Misalignments, on the other hand, disable the vastus medialis and increase the muscular imbalances that cause wear in the knee. You can protect your knees and strengthen the vastus medialis by following three basic rules for the warrior poses.
First, make sure your knee is bent properly to a right angle, so the weight is centered in your heel. If your toes are gripping, it’s a sign that your knee is going too far beyond your heel.
Second, don’t let the inner arch of your foot collapse, for this is a sign that your knee is turning inward too much. We sometimes compensate for this collapse by shifting weight to the outer edge of the foot, causing the inner heel to lift. But this stresses the outer knee and defeats the purpose of the pose. The challenge of aligning the knee is to keep your inner heel and big toe mound grounded while keeping the inner arch of the foot lifted. These two actions—grounding and lifting—will keep the knee from turning inward or outward too much. Lift your toes to help engage and lift the inner arch; as you bend your knee, draw the energy from the inner arch up through the calf to your inner knee, so that your knee remains directly over your heel and does not turn inward.
Third, make sure that the heel, kneecap, and hip joint of your bent leg are in the same plane by allowing a slight turn of the hips. (If you were doing the pose next to a wall, your outer right ankle, knee, and hip would all be touching it.) To achieve this, when you bend your knee, let your outer hip descend toward the floor (as if you had something heavy in your hip pocket) as you lift energy from your inner arch up through your inner knee. This will make your leg spiral out as you bend it, until your heel, kneecap, and hip joint are all aligned.
The purpose of these three actions in the bent leg is to ensure that all four quadriceps muscles are working harmoniously to stabilize the knee. As a result, the vastus medialis gets a much-needed workout that brings it into balance with the other quadriceps. To confirm this, gently pinch your thigh above the inner knee to check that the muscle there—the vastus medialis—is as firm as the thigh muscles at the outer knee.
Standing poses can strengthen and stabilize your knees, helping you to overcome structural imbalances that might otherwise lead to chronic wear and tear (and ensuing pain) in your knees.
Trikonasana
Proper alignment of the knee in the warrior poses automatically gives the vastus medialis a healthy workout. Now you can apply these same actions to the straight-legged poses like trikonasana, in which working the vastus medialis consciously is more challenging.
Step your feet wide apart, turning your left foot in 45 degrees and
your right leg out 90 degrees, toward the edge of your mat. Bend your
right knee slightly and align your heel, knee, and hip as in warrior
pose. Then straighten the leg mindfully, engaging the vastus medialis,
especially in the last 20 degrees of extension. If you engage this
muscle properly and your leg is aligned as you straighten it, you’ll see
your kneecap draw straight up your leg, and you’ll find it nearly
impossible to lock your knee. But if you let go of the vastus medialis
even for an instant, the knee can easily hyperextend and lock into that
position.Fold at the hip crease to take trikonasana to the right. Keep the vastus medialis firm and lift along your inner thigh, maintaining the straightness of your leg without locking the knee. If you feel pressure in the knee joint, you’ve probably relaxed the vastus medialis and hyperextended your knee. Come out of the pose and try again. As a bonus for good alignment, you’ll feel a stronger stretch along the inner edge of your thigh, from your inner knee back toward your sit bone. Be careful not to overstretch: use the support of a block for your hand if you need it.
Conclusion
The standing poses of hatha yoga provide powerful and effective means for strengthening and stabilizing your knees, helping you to overcome structural imbalances that might otherwise lead to chronic wear and tear (and ensuing pain) in your knees. A little extra mindfulness in aligning and working your legs in these poses will enhance the natural therapeutic benefits these poses have to offer.Thursday, June 26, 2014
Tip of the Week: Airplane and Car Yoga
Going on a long road trip or airplane ride this summer? Here are some adapted postures from matadornetwork.com to help
release tension from your spine, stretch your legs, increase your circulation, let go of tightness
in the upper and lower back, and keep you limber...all while wearing a seat belt! They can also be used in
any confined space: cars, airplane seats, buses, office cubicles…
Mountain Pose

(Tadasana)
Close your eyes, and focus on your breath. Sit up straight. With palms facing up, rest your hands at your sides or on your legs. Push the shoulders down and feel yourself lengthening from the crown of your head.
If you wish, exhale, and tilt your head to the left to feel a stretch in your neck and trapezoid. Inhale, bring your head back to center and exhale to tilt your head to the right.
Sitting straight up, inhale to bring your hands above your head and grab your right wrist. If you don’t have enough space, hold on to your right elbow and fold your arms. Exhale while leaning to the left from your rib cage.
Make sure your hips stay level and only lean as far as is comfortable for you. You should feel the stretch along your obliques. Hold here for a few breaths and then on your inhale return to center. Exhale, and lean to the other side.
You should feel a stretch in your chest and spine. Hold here for a few breaths. Release with an inhalation.
(Eka Pada Rajakapotasana)
Lift your right leg and place your right ankle onto your left knee. Your shin should be parallel with the dashboard. Flex the foot of your right leg to protect your knee.
Exhale as you hinge forward with a straight back. You should feel a stretch in your hips, outer thighs, and in your lower back. Breathe and try to relax in this position. Be sure to reverse sides.
(Ardha Matsyendrasana)
Inhale and sit up straight, shoulders away from ears. Cross your right leg over left, if you can.
Place your right arm behind you (on the headrest or outside the seat) and exhale while turning just your chest and abdomen to the right, moving your left shoulder forward and your right shoulder back. Place your left elbow on the outside of your right knee, at a 90-degree angle and palm facing out. If your legs aren’t crossed, then place your hand, palm facing out, on the outside of your knee.
Look gently over your right shoulder and breathe. Twists are great for the abdominals and obliques, as well as the spine. Hold this position for a few breaths; expand your chest fully. Exhale to twist to the other side.
Mountain Pose

(Tadasana)
Close your eyes, and focus on your breath. Sit up straight. With palms facing up, rest your hands at your sides or on your legs. Push the shoulders down and feel yourself lengthening from the crown of your head.
If you wish, exhale, and tilt your head to the left to feel a stretch in your neck and trapezoid. Inhale, bring your head back to center and exhale to tilt your head to the right.
Seated Sun Salutations
(Surya Namaskara)
Inhale to bring your arms up as high as you can get them. Exhale and bring hands to prayer position. Let your arms come to your side.
Inhale, and with a straight back lean forward at the waist into a Forward Fold. Exhale to let the head and arms relax. Inhale while returning to a sitting up position and sliding your arms along your sides and into the air. Exhale to prayer position.
That is one Seated Sun Salutation. Perform as many as you feel comfortable doing.
Half Moon Pose
(Ardha Chandrasana)Sitting straight up, inhale to bring your hands above your head and grab your right wrist. If you don’t have enough space, hold on to your right elbow and fold your arms. Exhale while leaning to the left from your rib cage.
Make sure your hips stay level and only lean as far as is comfortable for you. You should feel the stretch along your obliques. Hold here for a few breaths and then on your inhale return to center. Exhale, and lean to the other side.
Seated Cobra Pose
(Bhujangasana)
Lean forward slightly from the back of your seat and stick your chest out. Place your hands on your knees. Inhale and lift the heart while raising your chin and looking at the ceiling. Keep your shoulders away from your ears.
You should feel a stretch in your chest and spine. Hold here for a few breaths. Release with an inhalation.
Pigeon Pose
(Eka Pada Rajakapotasana)
Lift your right leg and place your right ankle onto your left knee. Your shin should be parallel with the dashboard. Flex the foot of your right leg to protect your knee.
Exhale as you hinge forward with a straight back. You should feel a stretch in your hips, outer thighs, and in your lower back. Breathe and try to relax in this position. Be sure to reverse sides.
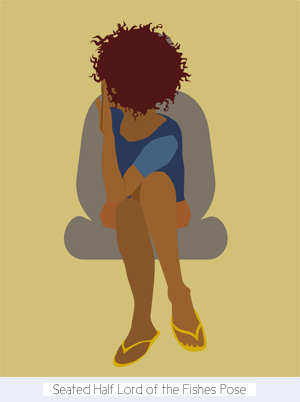
Seated Half Lord of the Fishes Pose
(Ardha Matsyendrasana)
Inhale and sit up straight, shoulders away from ears. Cross your right leg over left, if you can.
Place your right arm behind you (on the headrest or outside the seat) and exhale while turning just your chest and abdomen to the right, moving your left shoulder forward and your right shoulder back. Place your left elbow on the outside of your right knee, at a 90-degree angle and palm facing out. If your legs aren’t crossed, then place your hand, palm facing out, on the outside of your knee.
Look gently over your right shoulder and breathe. Twists are great for the abdominals and obliques, as well as the spine. Hold this position for a few breaths; expand your chest fully. Exhale to twist to the other side.
Thursday, June 19, 2014
Tip of the Week: Bikram Yoga is the Fountain of Youth
Recently a student of ours sent in a picture showing the difference Bikram Yoga has made around her eye area. Amy has only been practicing since this January, but has managed to really push herself by coming to 84 classes in that time. In just 5 months she has has already lost 40 pounds. She hasn't done anything differently except for adding Bikram Yoga to her life. She strives to practice about 5 times a week, and has found that she has a great deal more energy and sleeps much better at night. She says that Bikram Yoga has changed her life for the better in so many ways.
Amazing results that show you're "never too old, never too bad, never too late, and never too sick to start from scratch once again."
Wednesday, June 11, 2014
Tip of the Week: Anyone With a Bigger Body Can Do Yoga
Amy Vaughn from MindBodyGreen wrote the following article called "6 Yoga Tips for Anyone With a Bigger Body".
In the yoga biz, the standard way to gain credibility is to be an RYT-200. That means Registered Yoga Teacher with 200 hours of training. Well, I’m an FYT>200; that’s a Fat Yoga Teacher at over 200 pounds. I’m very conscious of the fact that there aren’t a lot of us. Two-thirds of Americans are overweight or obese, but that statistic is not reflected in yoga teachers or in yoga classes. I wish that were different.
The skinny (usually white) girl may be the picture of yoga that marketers want to sell us, but in real life, yoga teachers have never been anything but gracious to me. Sure, there have been a few misguided attempts at unsolicited advice (“Have you tried fasting/juicing/hot yoga/etc.?”), but I've always been welcomed with open arms.
Students, on the other hand, sometimes don’t know what to make of me. Often there's a quickly concealed look of surprise when they find out I’m the teacher. I can’t count the number of times I’ve been tempted to blurt out, “I’m genetically predisposed to obesity and I’m on a medication that causes weight gain! I go to the gym; I do my cardio! I’m a vegan, for crying in the sink!”
But I don’t. The way other people deal with being confronted by a yoga teacher who doesn’t fit the stereotype is their own baggage.
The point is this: yoga isn’t just for the thin and flexible. Anyone who’s open to it can benefit from it. It can adapt to any and every body. If you're a bigger-bodied yogi or yogini, it may help to keep the following in mind.
1. Take it easy.
We're conditioned to think that exercise needs to be fast and hard to be worthwhile. This mindset has infiltrated yoga to the extent that the faster-paced vinyasa styles have become the mainstay. However, one of the best things you can do for your body is s … l … o … w ... d … o … w … n. Slower forms of yoga improve flexibility and strength while balancing the nervous system; plus, they flush the chemicals released by stress that cause inflammation and weight gain. If you’re just beginning, look for “gentle” classes. If you’re lucky enough to live near a studio offering Yoga for Bigger Bodies or something similar, take advantage of that!
2. Follow your instincts.
The most important disposition you can have to keep yourself free from injury and gain all the mental benefits of yoga is to listen to your body when moving into and out of every pose. Every single body on the planet is unique. Not all postures will work for every body. Plus, there's no requirement for teacher trainings to cover the special needs of larger bodies. Listen inward just as much as you listen to the teacher.
3. Think of your weight as a weight.
Keep in mind that if you’re in a room full of smaller people, you're doing a lot more work than them. For example, in arm balances, I’m lifting at least 50 pounds more than most other people in the room. Don’t give yourself a hard time for respecting the needs and limitations of your body. That’s the real work of yoga.
4. Use props.
You can always use straps to make your arms longer or blocks to bring the floor up to you. In lunges, if your hands don’t reach the floor, use blocks. When the teacher guides everyone into a bind and your hands don’t reach each other, grab hold of your shirt or pants to find the twist or stretch. If getting up from the floor is tricky business, consider the ultimate prop and try a chair yoga class. In any situation you encounter, don’t hold back from being creative. Determine the intention behind the posture: is it to build strength or to stretch a certain set of muscles? Figure out a way to make it happen. (*In Bikram class, feel free to use the ballet barre at the back of the room for any of the balancing postures. If you have trouble twisting your arms in Eagle pose, just grab your opposite elbows or shoulders. Always ask a teacher before or after class about any difficulties you're having and they will happy to discuss modifications with you.)
5. Find the right teacher.
Don’t waste your time in a class that doesn’t help you feel good about yourself. Move on until you find a teacher you enjoy. Yoga should leave you feeling refreshed and renewed, ready to face the world with clarity and compassion, or at least a little more tolerance and patience.
6. Remember why you’re there.
Yoga is first and foremost a mental practice. The postures provide an opportunity to practice staying present with our physical experience, observing and accepting ourselves in this moment exactly as we are. The process gives us the chance to exert control over our thoughts. For some of us, myself included, the hardest part can be letting go of the constant stream of negativity and self-badgering that wrecks us, taking away our confidence and any sense of ease.
The mental practice of yoga is demanding but it’s entirely worthwhile. We cannot be at peace if we're at war with our bodies. Choose peace!
Photo Credit: Shutterstock.com
Subscribe to:
Posts (Atom)