Tuesday, January 26, 2016
Tip of the Week: Yoga Helps You Get Pregnant
Doing Bikram Yoga during pregnancy is not only safe but also a healthy experience throughout the term of your pregnancy. With your doctor’s permission and knowing Bikram’s modifications, continuing your practice during pregnancy can be a beautiful time for you and your baby.
If you aren't pregnant yet, having a strong practice before you conceive is very beneficial. With a solid practice already in place, as long as you're feeling good you may just continue your regular practice after you conceive until you feel the need for the modifications (between 8 and 12 weeks), and under the advice of your doctor or midwife. Many women have practiced right up until delivery. You may notice that the practice is very challenging in the first trimester as you are adjusting to hormones and increased blood volume.
The first trimester is a vital time for the developing fetus and you may be tired and/or feeling ill. Therefore, it is best to wait until after your 12th week before starting the yoga for the first time. Postures are modified for pregnancy but done with the regular students so you are welcome at any class.
If you've been having difficulty conceiving, the following by Genny Wilkinson-Priest on Healthista answers the question: "Can Yoga Help You Get Pregnant?"
"Many women today, whether because they prioritise their careers or meet their partner later in life, are starting their families later in life. In fact, the average age a woman gives birth in this country reached 30 for the first time ever last year. While post-35 – the age at which doctors warn fertility takes a nose dive – some women get pregnant easily; others find it difficult to conceive without (or even with) the use of medical intervention like IVF.
When you’re trying to get pregnant and it’s not happening, you start to examine aspects of your life that might be a factor blocking conception such as the amount of alcohol you drink or the number of hours you work in a stressed-out office environment. You might scrutinise how you exercise as studies have shown too much or too little can affect hormonal balance and the regularity of a woman’s cycle.
I should know – when trying to conceive six years ago, I went through a ‘bat shit crazy’ phase as my husband now likes to call it. I wanted a baby so badly that it was all I could think about and my moods swung wildly, culminating in one episode when I hurled a glass of wine across the kitchen table at my husband over the mildest of infractions. It was only when I let go of my deeply rooted desire, and practiced yoga and meditation daily, that I got pregnant.
Zita West is one of many fertility experts that recommends yoga to her patients who are having difficulty conceiving. ‘Any exercise that involves mindfulness, breathing techniques and meditative visualisation has many physical, emotional and mental benefits,’ she said, adding that yoga is a calming antidote to any woman consumed by an overwhelming desire for a baby, the resulting stress of which becomes an impediment to conception itself.
Yoga teaches us that suffering is caused by attachment. In this case it’s never more true than when trying to get pregnant month-in, month-out, buying stacks of ovulation kits, popping ovulation stimulating medication such as Clomid like tic tacs, and going through the slog of IVF treatment.
Did yoga help me conceive? I can’t say for sure, but it did help me calm down and keep things in perspective. I now have four children and when I was trying to conceive I practiced many aspects of yoga from postures to meditation to mantra to visualisation. Yoga helped me connect with, better know and understand my body; I believe this was a crucial factor in my fertility."
Wednesday, January 20, 2016
Tip of the Week: 5 Things to Think About in Savasana
Although Savasana is one of the 26 postures in the Bikram Series, no body ever treats "dead body pose" as a serious pose. We are too busy fighting bodily tension, feeling guilty for relaxing, or anticipating the next pose. Relaxing is one of the most beneficial things you can learn to do in life. In order to practice a successful savasana pose, we should remember our five keys to hatha yoga :
- faith
- patience
- determination
- concentration
- self control
Here’s a few tips to enhance your savasana experience ::
- always lie face up with your feet facing away from the teacher. This is time-honored tradition in the East, and shows respect for all beings
- palms upward
- feet relaxed and dropping out to the side
- eyes open
- breathing normal (means forget about your breathing)
- imagine all the spark has left your body
- let the floor support you
- relax the body as a whole unit
Tuesday, January 12, 2016
Tip of the Week: Stretch Hamstrings in Standing Separate Leg Stretching Pose
The following by hotyogadoctor explores some ways move to into Standing Separate Leg Pose when you have a difficult time straightening your back or legs from tight hamstrings.
There are a several poses in the series where straight legs are ‘demanded’ by the script, but actually the outcome of the pose combined with YOUR own flexibility and capabilities means that you must understand the physiological need to make the choice of having EITHER bent OR straight legs. The standing poses of this type, where the choice is crucial, are:
With Hands to Feet you already know to keep your body on your legs. If you have even a little space between body and legs, then you start to use your arms in a different way. Your shoulders erroneously get engaged and the result is LESS STRETCH through the back of the body.
Now, let’s look at Stranding Separate Leg Stretch pose. If you examine what’s happening in this pose you’ll discover it’s almost identical to Hands to Feet pose. The only real difference is that your legs are apart instead of being together. Just like Padahastasana, you must engage your biceps to pull. When you do, the shoulders move away from the head, decompressing the neck, recruiting more power, and at the same time resolving tension.
Now that sounds pretty simple but you need to make sure of a couple of other details. The instructions in most studios are to step out 4 feet. But did you know you can have your feet too far apart for your body?
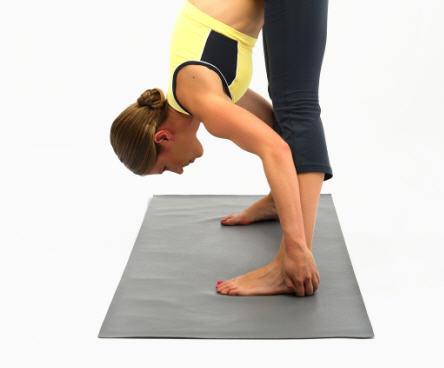
The photo above is of a friend of mine, Lauren who practises yoga in another city. She wasn’t getting anywhere with this pose so I asked her to do it for me the way she has been taught. This is REALLY how this happened, honest! When you step out too far your grip is compromised. When my husband started Hot Yoga years ago, he was stepping out too far and causing spasms in his abductor muscles. So you can acknowledge that the command to ‘step out further if your forehead doesn’t touch the floor’ doesn’t apply to everyone.
Anyway, I digress. What Lauren was doing was following (recited script) directions. Her step out was as commanded but then she could only reach the sides of her feet. And she was only able to slip her fingers in under her arches at a 90 degree angle. This is the least effective foot grip.
Ideally you want to be grabbing your feet from behind your heels. If you can’t manage that then aim to grip from the sides of your heels, and if that is difficult, grip as far to the back as possible and definitely behind the arch. Try bending your legs quite a bit more than usual to get the grip.
Then bend your elbows near your shins and pull with your biceps, trying to angle your elbows close to your legs. With your legs bent and the pull as described you begin to feel a lengthening stretch not only in your legs but also in your back. In other words, what you do by standing with your legs more closely together and BENDING your legs, creates more EASE in the back of your legs.
Again, what you are doing is finding the hidden length in your hamstrings when you BEND your legs. See below. The photo above is when Lauren is standing with her legs too wide and her grip is wrong, and halfway up the foot at the arch.
As soon as Lauren took a slightly less wide step (below), she could grab her feet more from the back where they should be. Her legs were a bit more bent but immediately she could feel the stretch really WORKING through the back of her body. She was able to find more length in her legs and the pose INSTANTLY became easier.
See the more effective stretch (above)? OK now look at the shoulder and hand positions in the photo with the shorter step out – notice the difference? This is the right way to do it!
Now see what happens (photo below) when Lauren steps out too far – this time from the side.
The
other issue is working out whether to keep your legs straight or bent.
Mostly students straighten their legs before they are ready. In reality,
most students should have their legs bent. Do you remember the stretch
you get in Hands to Feet?
That is for most students a bent leg pose. But you still manage to get your delicious stretch through the legs. This other Stretch pose uses the same concepts. When you come down, arms out, bend your legs and slide your hands down the back of your calf muscles to reach around behind the heels. With every fiber of your being, work on straightening your back. With your pull, work your chest through your shoulders.
Try to feel an arch in your spine rather than a rounded element. ONLY when your back is straight can you even contemplate straightening your legs. Most students should practise this pose with bent legs.
There are other poses which require you to pull on your feet where you need to sacrifice the desire for straight legs and bend up the legs to pull with your biceps muscles. These include Pashimottanasana (near the end) and you can even use this principle in your sit-ups.
There are a several poses in the series where straight legs are ‘demanded’ by the script, but actually the outcome of the pose combined with YOUR own flexibility and capabilities means that you must understand the physiological need to make the choice of having EITHER bent OR straight legs. The standing poses of this type, where the choice is crucial, are:
- Hands To Feet Pose, (Padahastasana)
- Standing Separate Leg Stretching Pose (Dandayamana Bibhaktapada Paschimottanasana).
With Hands to Feet you already know to keep your body on your legs. If you have even a little space between body and legs, then you start to use your arms in a different way. Your shoulders erroneously get engaged and the result is LESS STRETCH through the back of the body.
Now, let’s look at Stranding Separate Leg Stretch pose. If you examine what’s happening in this pose you’ll discover it’s almost identical to Hands to Feet pose. The only real difference is that your legs are apart instead of being together. Just like Padahastasana, you must engage your biceps to pull. When you do, the shoulders move away from the head, decompressing the neck, recruiting more power, and at the same time resolving tension.
Now that sounds pretty simple but you need to make sure of a couple of other details. The instructions in most studios are to step out 4 feet. But did you know you can have your feet too far apart for your body?
This photo shows Lauren is stepping out too wide
The photo above is of a friend of mine, Lauren who practises yoga in another city. She wasn’t getting anywhere with this pose so I asked her to do it for me the way she has been taught. This is REALLY how this happened, honest! When you step out too far your grip is compromised. When my husband started Hot Yoga years ago, he was stepping out too far and causing spasms in his abductor muscles. So you can acknowledge that the command to ‘step out further if your forehead doesn’t touch the floor’ doesn’t apply to everyone.
Anyway, I digress. What Lauren was doing was following (recited script) directions. Her step out was as commanded but then she could only reach the sides of her feet. And she was only able to slip her fingers in under her arches at a 90 degree angle. This is the least effective foot grip.
Ideally you want to be grabbing your feet from behind your heels. If you can’t manage that then aim to grip from the sides of your heels, and if that is difficult, grip as far to the back as possible and definitely behind the arch. Try bending your legs quite a bit more than usual to get the grip.
Then bend your elbows near your shins and pull with your biceps, trying to angle your elbows close to your legs. With your legs bent and the pull as described you begin to feel a lengthening stretch not only in your legs but also in your back. In other words, what you do by standing with your legs more closely together and BENDING your legs, creates more EASE in the back of your legs.
Again, what you are doing is finding the hidden length in your hamstrings when you BEND your legs. See below. The photo above is when Lauren is standing with her legs too wide and her grip is wrong, and halfway up the foot at the arch.
As soon as Lauren took a slightly less wide step (below), she could grab her feet more from the back where they should be. Her legs were a bit more bent but immediately she could feel the stretch really WORKING through the back of her body. She was able to find more length in her legs and the pose INSTANTLY became easier.
This photo shows Lauren doing it correctly

This photo shows the shorter (correct) step from the side
Now see what happens (photo below) when Lauren steps out too far – this time from the side.
This photo shows Lauren stepping out too wide
That is for most students a bent leg pose. But you still manage to get your delicious stretch through the legs. This other Stretch pose uses the same concepts. When you come down, arms out, bend your legs and slide your hands down the back of your calf muscles to reach around behind the heels. With every fiber of your being, work on straightening your back. With your pull, work your chest through your shoulders.
Try to feel an arch in your spine rather than a rounded element. ONLY when your back is straight can you even contemplate straightening your legs. Most students should practise this pose with bent legs.
There are other poses which require you to pull on your feet where you need to sacrifice the desire for straight legs and bend up the legs to pull with your biceps muscles. These include Pashimottanasana (near the end) and you can even use this principle in your sit-ups.
Tuesday, January 5, 2016
Tip of the Week: 80/20 Breathing
If you find yourself crash landing with a big "AAHHH!" exhale through the mouth after flying like an airplane in Full Locust Pose, or have to come out of the backbend or Camel Pose early because you feel like you're about to suffocate, it is very likely that you are holding your breath and not breathing properly. If you can learn the simple breathing technique called "80/20 breathing", you will find much more energy, strength, and comfort in the posture.
80/20 Breathing
1. Inhale 100 percent and hold the breath just for a moment.
2. Move into the posture while exhaling out only 20% of the air through your
nose with your mouth closed.
3.
Inhale only 20% of your lung capacity by taking in a little sip of air through your nose. Continue with this 20% exhalation and inhalation as you
hold the pose, keeping the lungs 80% full.
4. Exhale completely through the nose once you
finish the posture.
The 80/20 breath is used for balance and energy while doing all of the standing and back-bending postures.
Monday, December 28, 2015
Tip of the Week: Spine Twisting Pose
Photo Cred: Bikram Yoga Halifax
Benefits :
- This is the only posture that twists the spine from top to bottom, which increases circulation to all the spinal nerves, veins, and tissues, and improves the elasticity of the spine.
- Spine Twisting relieves
lower back pain and helps prevent slipped discs, rheumatism of the
spine, kyphosis, scoliosis, cervical spondylosis and arthritis.
- It calms the nervous system.
Turn your head to the left and rotate your face, shoulders and torso to the left, twisting as much as possible. It is important to try to keep both buttocks and the right knee on the floor, and maintain a straight spine. Here, fully emptying the lungs in normal breathing facilitates the twist. As you exhale, try to twist around a little farther. Hold the posture for 20 seconds.
Tips:
- Make sure you are not sitting on your heel. Open up your leg enough to allow your hips to sit level on the mat.
- When you bring your arm over and across, make sure the hand, knee and the heel are all touching at the same spot.
- Point the toes of the leg bent on the floor, heel touching the outside of the hip.
- Before you turn, lift your upper body toward the ceiling, and try to lift the abdomen up and out of the pelvis, so you can twist more of the torso, including the abdomen when you turn.
- Think: inhale – stretch up, exhale – twist deeper.
Monday, December 21, 2015
Tip of the Week: Yoga Helps Defeat Anxiety
Being right in the middle of the holiday season when stress and anxiety can be on the high side, we felt the following article from yogiapproved.com would be helpful in reminding us why yoga is so important for defeating anxiety.
Anxiety has taken many peaceful mornings from me. It has taken afternoons, nights and entire days too.
With it comes shaky and sweaty hands, racing thoughts, shallow breathing, and a sense of helplessness. Most of my life I thought that there was no alternative. I spent years trying to find a way to manage my anxiety. I found things that helped a little, but nothing truly took me to a new way of being until I found yoga. It wasn’t immediate. I didn’t walk onto the mat and change forever. But through yoga and my dedication to it, my life is no longer ruled by anxiety.So, what exactly is it about yoga that helps anxiety?
1. Pranayama (Breathing):
The simple act of mindful breathing can help reduce anxiety. When you focus on the breath, your mind has a chance to rest and let go of negative thoughts. Yogic breath is also good for the body. Deep breathing increases oxygen levels in the blood supply, which helps remove toxins from the body. It also increases lung capacity and helps improve digestion.2. Asanas (Yoga Poses) and Their Rewarding Challenge:
The practice of asanas (poses) is good for both mind and body. Physically, asanas help release the tension that anxiety creates, allowing the body to feel recharged and healthier. When the body feels better, so does the mind. The challenges you face on the mat reduce anxiety by taking your mind off your worries and fears.Asanas also teach the student to be patient and let go of things. Just like finding (and re-finding) your balance and mastering a pose, acceptance takes time and patience. Perfection is not only unnecessary, but usually unrealistic. Each time I lose my balance and fall out of a pose I am forced to face my imperfection and accept it. At first, I got frustrated when I fell out of a pose.
With time, I have learned to laugh, smile, and try again.
3. Meditation:
Meditation is challenging, yes, but not impossible. The ability to clear one’s mind of all thoughts is a skill that takes time. It is a path, not a goal. Meditation starts by simply taking the time to focus on your breath. Meditation gives your mind a chance to slow down and teaches your body to relax. In addition, with a regular meditation practice, you will begin to notice patterns in your thinking. The things that trigger anxiety, panic, and fear will become apparent to you. Once this happens, you can learn to change the patterns by recognizing your triggers.Yoga is a deeply soothing and healing practice. Showing up is the hardest part.
Just step onto your mat… the practice will take care of itself. Through the simple steps of conscious breathing, regular asana practice, and meditation, anxiety is a thing that can be controlled, reduced, and ultimately overcome one breath, one pose, one day at a time. Take hold of your practice. Take hold of your life!
Monday, December 14, 2015
Tip of the Week: Lower Ribs on Thighs in Stretching Pose
Bikram Yoga SLC instructor Nella Holden
The goal in Stretching Pose (Paschimottanasana) is not to bend forward from the spine but to extend forward so that the front and back of your torso lengthen evenly. The folding should occur at the hips, not the spine or waist. You will feel the stretch in the back or west side of the body but the front of the body needs to make space to elongate the spine.
Tips:
*Imagine placing your lower ribs on your thighs. Even if you are nowhere close to being able to actually do this, envisioning doing this in your mind will help to straighten out and elongate your spine. Bring your back ribs downward away from the ceiling to bring your front ribs closer to your thighs.
*If you are able to place your lower ribs on your thighs, envision placing your upper ribs on your knees!
*If you feel like your bottom ribs are stuck to your abdomen, you are folding from your waist rather than your hips. You can lift upward slightly to free your lower abdomen, spread the diaphragm and extend forward towards your chest.
Monday, December 7, 2015
Tip of the Week: The Exit is Part of the Posture
As important as it is to stay focused and concentrate on alignment when setting up and executing a posture, it is equally important to stay mindful of these things when exiting the posture. Your exit should be as graceful and focused and done as slowly and carefully as your entrance. Many times we work so hard on focusing on the posture itself, that when we hear the instructor say "Change!" we think the posture is over and it's time to relax. But care should be taken to reverse out of the posture in exactly the opposite way as we went into it to protect the spine, keep from straining muscles, and to keep the mind focused. Paying attention to how you start, end, and move between postures will also help to conserve your energy as you flow through class.
Tuesday, December 1, 2015
Tip of the Week: Decompress the Spine in Padahastasana
photo from Bikram Yoga Kauai
With a tight grip and a lift of the hips, you can bring length not only to the hamstrings but quite literally pull space between the vertebrae (spinal decompression). The key to staying safe is to keep your chest pressed to thighs to avoid overstretching at the lumbar spine. If your hamstrings are tight and you need to grab the back of your calves instead of your heels, still try to feel the touch of your stomach on your thighs and your chest on your knees, and then keep them there as you try to straighten your legs.
You also want to draw the belly in to encourage the muscles framing the spine to lengthen and release more readily. Lift hips until you feel a stretch and lift the kneecaps up to engage the quads.
Please
be careful: if your back is sensitive or injured – BEND YOUR KNEES as
you lower your hands to the floor from Half-moon. You can even place
your hands on your thighs to protect your back better. - See more at:
http://theyogaoasis.com/padahastasana-handstofeet-pose#sthash.052MrPzG.dpuf
Beginners
Please be careful: if your back is sensitive or injured – BEND YOUR KNEES as you lower your hands to the floor from Half-moon. You can even place your hands on your thighs to protect your back better.
Take your time in the first set and soften, exhale, and relax. When it’s time to grab your heels, students with limited flexibility: do the best you can in keeping your hands and arms behind by bending your knees more. If you are NOT able to place your hands underneath the feet, grab a hold of your calves, or simply hold onto each elbow behind your knees.
Keep working to straighten the legs an inch at a time, using your arm strength to pull up on your calves, ankles or heels.
Be careful coming out of the pose, ascend the same way you went down, keep your knees bent and place your hands on your thighs, if needed.
Intermediate
Now that you’re getting close to straightening your legs, press your face into your shins, as you lift your hips forward and up toward the ceiling and front of the room. This combined movement will allow you to use your body for leverage in order to better stretch your hamstrings.
An important concept in understanding the dynamics of Hot Yoga is “isolation”: flexibility and strength, relaxation and intensity, softening and hardening. Soften and relax the area you’re trying to stretch. In this pose, it is the hamstrings (back of the legs) and lower back, both connected by the sciatic nerve. Strengthen your arms pulling up on your heels and contract your quadriceps muscles (front of the thigh).
Pull on your heels with your biceps, not the shoulders. The shoulders work BACK towards your hips and AWAY from the ears.
Advanced
If your legs are straight and your upper body is flat against your legs, don’t place your fingers under your heels. Instead, cup your heels from the side so the thumb, forefinger and the webbing between your thumb and forefinger touch the floor. If you place the fingers under the heels, it shortens the hamstrings and inhibits your flexibility. It’s going to feel weird at first, but after a few times you should start experiencing a deeper stretch.
One footnote: your hands will have a tendency to slide up, don’t let it happen, keep your hands down.
We’re not done yet! Halfway into the pose, slowly begin to look down at the top of your feet. Keep your chin on your shins, lift your shoulders up toward the ceiling, and pull your head to your feet. Don’t crunch your neck. Your neck vertebra should line up with your back vertebra. Toward the end of the posture, lift your hips UP toward the ceiling and then SCOOP your tailbone UNDER to stretch the muscles around the sit-bones.
The final position is to touch your head to your feet, knees fully extended, quads contracted.
- See more at: http://theyogaoasis.com/padahastasana-handstofeet-pose#sthash.7etq7wQx.dpuf
Monday, November 23, 2015
Tip of the Week: Thanksgiving Food Swaps to Save Calories
Thanksgiving
may be the day to ditch your diet and indulge in your favorite holiday
foods, but making a few simple changes to your holiday menu can actually
save you up to 2,000 calories - without skimping on the flavor.
The average American will consume 4,500 calories on Thanksgiving according to the Calorie Control Council,
which found that 3,000 calories come from an indulgent turkey dinner
alone while another 1,500 calories can be attributed to hors d'oeuvres
and boozy beverages.
However,
a few ingredients swaps will ensure that you will enjoy all of your
favorite foods while still being able to button your pants on Black
Friday. An infographic from the calorie-counting app My Fitness Pal
shows that that slightly altering your Thanksgiving menu can help you
save hundreds - or even thousands - of calories this year.
Great idea: Calorie-counting app and website My Fitness Pal has created
an handy infographic featuring Thanksgiving holiday food swaps. Trading
dark turkey meat for some turkey breast will save you 50 calories
Secret recipe: One cup of mashed potatoes made with two per cent milk,
nonfat Greek yogurt, and three tablespoons butter has 108 calories less
than traditional recipes
Same
flavor: One fourth a cup of traditional gravy made from turkey
drippings, which has 131 calories and 9g of fat, can easily be swapped
for one four a cup of prepared low-sodium gravy mix
Swap dark meat for white meat
Dark
turkey meat has nearly twice the fat of white turkey breast and about
40 per cent more calories. Replacing three ounces of dark turkey meat
and skin, which has 147 calories and 5g of fat, with a three ounce
turkey breast with skin will save you 50 calories and 2g of fat.
Swap traditional mashed potatoes for a lighter recipe made with Greek yogurt
Mashed
potatoes are a Thanksgiving staple that is almost as common turkey, but
traditional recipes include mounds of heavy cream and butter.
While
a cup of homestyle mashed potatoes has 220 calories and 18g of fat, a
similar recipe made with two per cent milk, nonfat plain Greek yogurt,
and only three tablespoons of butter has only 112 calories and 6g of
fat.
Swap Greek yogurt for sour cream when making dip
Using
Greek yogurt in place of sour cream is another great way to save
calories when making Thanksgiving appetizers. While an ounce of sour
cream has appropriately 54 calories, the same amount of plain nonfat
Greek yogurt has about 16 calories.
Knowing that you are saving 38 calories per serving will make anyone feel better about going in for another scoop of dip.
Swap traditional gravy for low-sodium gravy mix
While it is undoubtedly delicious, adding a few ladles of gravy to your plate is an easy way to rack of the calories.
One
fourth a cup of traditional gravy made from turkey drippings, which has
131 calories and 9g of fat, can easily be swapped for one four a cup of
prepared low-sodium gravy mix.
And the subtle trade will save you 106 calories and 8g of fat.
Swap classic sweet potato casserole for a baked sweet potato
Sweet
potatoes covered in marshmallows are another Thanksgiving favorite,
however, a cup of the classic casserole packs 558 calories and 9g of
fat.
Having
one small baked sweet potato topped with one teaspoon of brown sugar
and one teaspoon of chopped pecans will save you a whopping 420 calories
and one teaspoon of shopped pecans will leave you with 420 calories and
7g of fat that you can save for dessert.
Sugary sweet: Have a baked sweet potato topped with brown sugar and
chopped pecans instead of sweet potato casserole with marshmallows to
save a whopping 420 calories
Family favorite: Green bean casserole made with cream of mushroom soup
and topped with fried onions has 235 calories and 15g of fat per cup,
but sauteed green beans with fried onions only have 91 calories
Healthier
ingredients: Using fat-free buttermilk instead of whole milk and half
the required amount of butter will help you shed 100 calories from your
stuffing recipe
Swap green bean casserole for sauteed green beans
One
cup of traditional green bean casserole made with cream of mushroom
soup and topped with fried onions has 235 calories and 15g of fat, but
if you get creative and saute a cup of green beans in one teaspoon of
butter and top it with one tablespoon of fried onions, you save 144
calories and 9g of fat.
Swap traditional cornbread stuffing for a lighter recipe made with fat-free buttermilk
Stuffing
and turkey go hand in hand on Thanksgiving, but one cup of cornbread
stuffing made with whole milk and butter has 470 calories and 17g of
fat. However, one cup of the same stuffing prepared with fat-free
buttermilk and half the butter of the traditional recipe only has 319
calories and 11g of fat.
This clever swap can also be done with other bread stuffing recipes in order to create a healthier side dish.
Healthier option: Swapping canned cranberry sauce for cranberry relish will save on calories and sugar
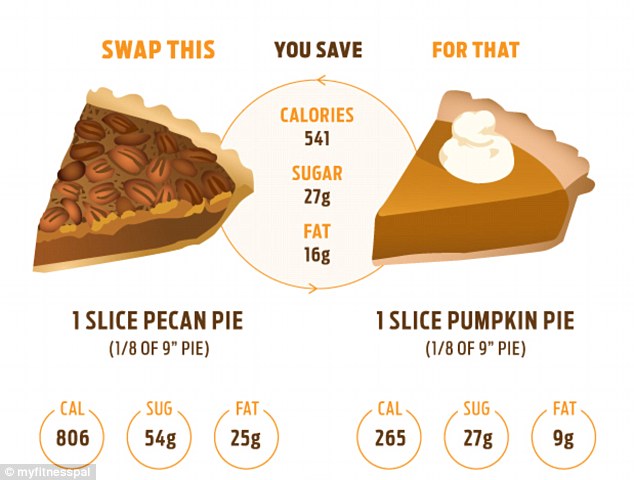
No-brainer: While one slice of pecan pie has 806 calories and 25g of
fat, a slice of pumpkin has only 265 calories and 9g of fat
Swap canned cranberry sauce for cranberry relish
Those
who love cranberry sauce, but are looking to save on the calories and
sugar that come along with the sweet dish, should consider substituting
cranberry relish for the popular side.
While
one fourth a cup of canned cranberry sauce has 105 calories and 26g of
sugar, one four a cup of raw cranberry relish has only 67 calories and
12g of sugar.
Swap pecan pie for pumpkin pie
Pecan pie and pumpkin pie are both Thanksgiving favorites, however, one of these desserts is far healthier than the other.
Swapping
one slice of pecan pie, which has 806 calories and 25g of fat, with one
slice of pumpkin pie will save you a whopping 541 calories and 16g of
fat.
With
only about 265 calories and 9g of fat per slice, pumpkin pie is one of
the few holiday desserts you don't have to feel guilty about.
Decadent
dessert: A baked apple made with brown sugar, butter, cinnamon and
topped with whipped cream is a healthy replacement for a slice of apple
pie à la mode - which packs 619 calories and 24g of fat
Swap slice of apple pie à la mode with one baked apple topped with whipped cream
Warm
apple pie topped with vanilla ice cream is another beloved Thanksgiving
dessert, but one slice paired with one third a cup of ice cream has
approximately 448 calories and 19g of fat.
However,
one baked apple made with one tablespoon brown sugar, one teaspoon of
butter, one teaspoon of cinnamon and topped with one tablespoon of
whipped cream has the same delicious taste with only about a quarter of
the calories.
The clever substitute only has 171 calories and 5g of fat.
Swap eggnog for apple cider
Most
people to tend to indulge in at least one holiday beverage on
Thanksgiving, but you may want to think twice before filling your glass
with eggnog. One cup of the creamy beverage has 223 calories and 11g of
fat.
If you are feeling festive, reach for a glass of apple cider, which only has 120 calories and zero fat per cup.
Swap a glass of wine with a wine spritzer
Wine
is another popular alcoholic beverage around the holidays, and if you
think you are going to have more than one glass, you may want to
consider this healthy swap.
Replacing
your five ounce glass of red or white wine, with three ounces of wine
topped with two ounces of club soda will save you 60 calories and help
you save room for another drink or dessert.
Want to make one of the swaps above? Check out the recipes by clicking "here".
Monday, November 16, 2015
Tip of the Week: Squeeze Your Glutes in Tree Pose
Tree pose is actually a very challenging posture when performed the
right way. Ideally, from the side view, your two knees should be in one
line. Many people are able to hold the foot up in place by cheating
and letting the hips/butt stick out with a swayed back. You need to
squeeze your butt muscles and push your hips forward, while at the same
time, pushing your knee gently down and back, to get everything in one
line from the side. Continuously stretch your spine up to grow taller.
The following by tracysfoodandthought.blogspot.com shows some good pictures and tips for opening your hips in tree pose by squeezing your glutes.
The pose I demonstrate above is "Tree pose". In Bikram's yoga practice there are a number of poses that help open up the hips.....when done properly! I can't tell you how many times I watch people do this pose improperly.....about 100% of the time! Even when the teacher clearly instructs to NOT have a "duck butt", guess what? Apparently no body knows what a "duck butt" is, OR their hips are so tight they can't help it! But if that's the case then you should take advantage of the use of your opposite hand and hold onto your foot to pull your bent leg down and back. The "goal" is to have both legs in one line, while pushing your hips forward to open them up! A good clue to whether or not you are doing this is to pay attention and contract your glute muscle (squeeze your butt muscle!) In the above picture you can see I'm still a good six inches away from that!
Tree pose, in Bikram's yoga, is NOT a balancing posture. Sure, you have to balance, but it's a hip opening posture, and your standing leg/hip/glute should be contracted...in other words, SQUEEZE your butt muscle! If you cannot squeeze your glute then you are not in the posture. Everybody is in a hurry to put both hands in prayer and look pretty! In the bottom photos I demonstrate my hands in "prayer position" and then only one of my hands in prayer, while the other holds onto my foot, while pushing my bent leg down and back, and while squeezing my glute muscle and lifting up on my knee cap of my standing leg/hip. This does two things. Squeezing my glute helps to open my hip flexor to bring my hip forward, and lifting up on the knee cap of my standing leg ensures that my standing leg is straight. Oh...and I also try and make myself tall (like a tree) by lifting my rib cage and shoulders, up and back, visualizing the top of my head being pulled up towards the ceiling, while on the opposite, rooting down through the floor with my entire foot (roots like a tree).
In my opinion it's much more important that you open up your hip than it is to balance with both hands in prayer, looking pretty, with a duck butt! But that's me. Eventually I want to get both of my legs in the same line, while having both hands in prayer, with full extension in my hips, now that would really be pretty! Pretty and correct according to the "dialogue". And I'm so close!
Monday, November 9, 2015
Tip of the Week: Look Backwards in the Backbend
Today's tip is a simple one to work on while doing the backbend in Half Moon.
*Look backward. The tendency for people who have issues with this pose is to look at the ceiling or the hands, or worst of all – and because of fear – forward. This strains the neck.
*While you’re going into the pose you will visualize tracing a line backward across the ceiling with your fingers. Where many get caught is by following the fingers with their eyes. Look beyond those fingers tracing that arc as you look backward (not up).
"Where your eyes go, your body will follow"...
For more detailed information on doing the backbend, click "here" and "here".
Learn
to see the back-wall behind you, but instead of dropping back, continue
lifting up through the sternum. Then, straighten out the elbows and
squeeze you palms together flat. - See more at:
http://theyogaoasis.com/instructions-for-standing-half-moon-backbend-from-our-friend-tomasz-goetel-owner-of-hot-yoga-evolution-instructions-for-standing-half-moon-backbend#sthash.ccIASszU.dpuf
Sunday, November 1, 2015
Tip of the Week: Make it to Class
As a teacher it can be even harder to squeeze your own personal practice into the day. After teaching class you can so easily skip out the studio doors to other things, thinking you’ve at least witnessed some yoga. But the fact is, if you are a Bikram teacher especially, you did not accomplish your own practice. You lead others through it, sure, you sweat a ton, but it’s not the same.You know what the hardest part of having a yoga practice is? Doing it. Doing the yoga. Day after day, year after year, and continue to have the discipline to get to the studio and get it done. I often say to my students that the hardest part of the yoga is actually putting the key in the ignition of the car and driving to the studio. Once you arrive you know you will go through class, whether it be wonderful, bad, ugly, gentle, easy, or inspiring, you will go through it.
Many times throughout a usual work week I have students come into the studio worried about what class will hold for them that day because they have not practiced in so long. “Why did I stop coming?” is a common question I hear them ask themselves. And let’s face it sometimes life just gets in the way. But you must also consider the fact that youare getting in your own way.
A yoga practice is not just a workout. It’s a commitment to a healthier way of living. It’s a commitment to taking time just for you to concentrate on your breath, your body, and your life in this present moment. And since I have struggled on and off with finding that time in my schedule to practice for years now, I thought I would share some tips on how to make it happen for you.
- Put it in your schedule. When I look at the month ahead and start to give availability to the studios I work for I also plot out where the practice times will happen. I like to practice a minimum of 4 times a week, but allow myself the odd week when it has to come down to 3 sessions. I actually put it into the calendar and make it a date as non-negotiable as any other commitment I have made in my life. If you put it down as an appointment with yourself make sure you honor it and get to class. You are important.
- Pack up your bag and clothes the night before. We’ve all had that moment when the alarm clock goes off at 5am and all we want to do is roll over and forget about that class starting in half an hour. If everything is ready to go and all you have to do is slip on some yoga clothes and stumble out to the car there will be less resistance. Train yourself to just get into the clothes half asleep and then once your dressed you will have less excuses as to why you would want to skip the class.
- Post it on Facebook. If your status update the night before was about how you were going to hit the hot room at a particular time you will probably make the class. I have used this trick so many times. You just told the world and some of your friends that practice that you will be there and for some reason this will make you feel accountable for keeping this promise to yourself especially if people comment back, “See you there!”
- Get a yoga buddy. My yoga buddy is the best. We’ve been practicing together for 5 or 6 years now. And if I know she is going to take class at a particular time I will definitely try and take it. We used to practice together everyday until I became a teacher, but we still see each other in the hot room at least 3 times a week. Sharing the yoga and experience of class with someone is incredibly fun, as both of our practices have developed throughout the years. And sometimes it’s easier to make a date with others than it is to make one with your self.
So here’s to hoping that you keep up your regular practice. The only way to get deeper in to the postures and have a better understanding of yourself and others is to practice. If you haven’t been to class in awhile – get going. The first step is always the hardest, but I can promise you it will be worth it.
Subscribe to:
Posts (Atom)