Great tip from lindsaydahl.com on one way to learn to love the heat in Bikram Yoga:
Take a long final savasana
Your instincts will tell you to jump up and leave, the moment the
teacher leaves the classroom. And if you’re like me, the thought of
laying in a hot sweaty heap one more millisecond sounds like torture.
Rest assured taking a long savasana
after class will help you handle the heat in future classes. When
teachers first told me this I filed it away in the “yoga teacher BS”
category, but here’s how and why it works:
During class you’re
working your ass off. You’re heart rate is up, the heat feels intense
and you’re constantly moving. When you have time at the end of the class
to relax, all of your body’s systems slowly go back to normal. This
process is important for several reasons, but when it comes to the heat,
you’re body has time to adjust in a way it can’t during class. When
you’re in final savasana the process of adjusting to the heat happens
ten fold. Think of it as a period for your body to absorb the muscle
memory from the work you did in the postures AND a time for it to
recalibrate to the heat.
It’s kind of like your body getting used
to a hot bath. After those first few painful moments, your body
eventually adjusts to the temperature of the water.
Stay in savasana for at least twenty deep, slow breaths. Your future self will thank you.
Happy Monday! Wouldn't you like to start your mornings feeling refreshed instead of sluggish? Here are some yoga techniques from yogatropic.com to help you get out of bed in the morning feeling restored.
Set Yourself Up for a Peppy Wake-up
If you know you have to get up early, or even if you’re just not a
morning person, there a few little things you can do at bedtime that
will knock a few snoozes off your typical morning routine.
Eat light, not late
It’s wise to pack your heavier, protein and carb-dense meals into
breakfast and lunch. Make dinner primarily veggies with a modest portion
of whole grains and light, lean protein (like beans or fish). It’s also
an excellent idea to avoid eating at least 4 hours before bedtime.
Sugar, alcohol and caffeine are also evening enemies, making it
difficult to fall asleep and even moreso to sleep well. If you know you
need to be functioning at full throttle early in the AM, following these dietary tips will
prevent your body from struggling to digest when it should be getting
some rest!
Set your alarm earlier
Be honest with yourself — how many times do you normally hit the
snooze button? Do the math, and set your alarm that many minutes earlier
than you actually need to be out of bed. Utilize your snooze time to
wake slowly and still get moving at a time that works best for your
schedule.
Sleep in your yoga clothes
If you’re planning to start your day with a yoga practice (Yes, yes,
yes! Do it!), swap your PJ’s for yoga pants! You’ll have no excuses in
the morning, and yoga clothes are way cozier, anyway! While you’re at
it, roll out the mat and set up your props, too. If you practice to a
DVD or video, cue everything up so you can just press ‘play’.
Breathe yourself to sleep
If you’re having trouble falling asleep, skip the counting sheep and
instead count the length of your breath, increasing the duration of your
exhale so that it’s longer than the inhale. Let the breath be soft —
not forced — and scan your body from toes to nose, inviting your breath
to relax every muscle in between. If you’re still too energized, try the
tense and release technique: squeeze and tense every muscle in your
body, holding your breath, clenching your fists and drawing into your
core for 3-5 seconds, or until you feel fatigued. Then release, and
relax into your bed. Repeat 2-3 times until you feel your whole body
grow lighter.
Sweet dreams!
Yoga Yourself Awake
When the dreadful alarm clock rings and you just can’t bear to move,
hit snooze if you must… but then try this simple routine to get the
blood and oxygen flowing so that waking comes naturally.
Fill up to wake up
The easiest way to begin waking the body doesn’t even require you to
move! Stay right where you are, but begin breathing deeply. Just as if
you’re waking from savasana, fill your chest to the brim, imagining that
you’re flooding each and every cell with clean, energizing oxygen. Keep
your eyes closed, and as you begin to feel more alert, roll onto your
back and place one hand on your heart and the other on your belly. Feel
your breath and feel the weight of sleep begin to shed like you’re
slipping out of a heavy sleeping bag.
Stretch long and wide
When you feel ready, reach your arms overhead and take another big
breath, then an even bigger one as you stretch all the way from the tips
of your toes to as far as you can reach behind you. Stay here for a few
breaths, letting your muscles grow longer. If you have room in your bed
(and won’t kick anyone sleeping next to you…!), spread your legs and
arms apart wide and stretch out like a star shining in all directions.
Give yourself a morning hug
Still moving slowly and breathing deeply, step your feet behind your
hips, then hug one knee, then the other, into your chest. Wrap your arms
around your shins and say “Good Morning!” to your lower back. If it
feels nice, rock around gently — side to side, back and forth.
Twist into a new day
Next, take your left hand to your right knee, hug your right arm
around your pillow, and drop your knees to the left for a gentle spinal
twist. Let your gaze fall to the right and sink your hips into your
mattress. Take 5 long, deep breaths before lifting your knees on an
inhale and exhaling to the opposite side. Careful not to knee your
partner, if you have one!
Sit up, Sunshine
By now, your alarm may have gone off again. Time to actually start
moving out of bed. But, not so fast! Roll onto your right side and help
yourself up as you would after a deep, rejuvenating savasana. Then turn
yourself to the edge of your bed and let your feet hang off the side.
Sit up straight and reach your heels forward, circling your ankles and
stretching out your hammies. Delish!
Juicy side stretch
Let your feet come down, then beginning with your right arm, plant
the left palm on your bed as you reach your right arm up and overhead
for three longs breaths (see photo at the top of the page). Switch to
your left, and if you have time, repeat once more on each side.
Stand tall: Ready for the day
Finally, plant your feet and on one giant inhale, stand up into
tadasana (mountain pose). Feel your feet on the ground below you. Feel
the expansiveness in your lunges and chest. Know that now, you’re ready
for anything. Take the first step into your day with confidence and
ease.
Namaste.
As part of the Bikram dialogue, we are constantly told to keep our shoulders away from our ears. By bringing
awareness to the position of the shoulders and adjusting them for
optimal position, you will find comfort that may have previously been
difficult to achieve. Many of us hold tension in the shoulders, often
without realizing it. Poor posture and stress are common contributors to
shoulder tension. The result: chronic tightening of the shoulders and a
forward slump. (Check your posture while driving or typing on the
computer and you’ll recognize the forward slump.)
Proper shoulder position is often overlooked during our practice due
to the focus required to simply get into each posture and then maintain
it. But if you take a moment to adjust the shoulders once in each pose,
your level of comfort will increase. Keep in mind this
one simple adjustment: Broadening the shoulders. Almost every asana can
benefit from broadening the shoulders.
To broaden the shoulders, feel them move away from each other in an
outward direction, and feel the heart open as the chest lifts slightly.
Then, move the shoulders down away from the ears. Important to note, be
sure you do not pinch the shoulders back. The movement of the shoulders
away from each other is the best way to ensure the shoulders remain
broad.
 To effectively relax your shoulders, you need to focus on your
shoulder blades (scapula) sliding down your back. The muscle that
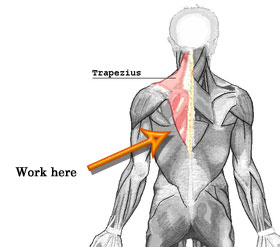
anchors the blades is the bottom part of the trapezius muscle. You also want to feel your collar bone (clavicle) widening and
the scapula sliding slightly toward one another. The end effect is an
open chest with relaxed shoulders and neck. Nothing should feel pinched
or gripped. Imagine the scapula is a slippery bar of soap sliding up and
down the back.
From the very first breathing exercise Pranayama, as your elbows come up, your shoulders should be down. In every single posture from there on out, your shoulders should be down and away from your ears. Introduce this movement to each pose in your practice, and you will find a new sense of ease you didn’t realize you had. Enjoy!
To effectively relax your shoulders, you need to focus on your
shoulder blades (scapula) sliding down your back. The muscle that
anchors the blades is the bottom part of the trapezius muscle. You also want to feel your collar bone (clavicle) widening and
the scapula sliding slightly toward one another. The end effect is an
open chest with relaxed shoulders and neck. Nothing should feel pinched
or gripped. Imagine the scapula is a slippery bar of soap sliding up and
down the back.
From the very first breathing exercise Pranayama, as your elbows come up, your shoulders should be down. In every single posture from there on out, your shoulders should be down and away from your ears. Introduce this movement to each pose in your practice, and you will find a new sense of ease you didn’t realize you had. Enjoy!
Are you experiencing muscle cramping, particularly in the feet during class? The heat associated with Bikram yoga can quickly drain the body of
fluids and electrolytes, which increases cramping. However, there are
several steps you can take to reduce cramping.
1. Drink plenty of water before class. Dehydration is a
common cause of muscle cramps. An electrolyte drink may help
reduce cramping because it lessens the severity of electrolyte and fluid
loss. Rather than a sugary sports drink, click "here" for natural electrolyte replenishment ideas. For a quick way to turn your own water into an electrolyte drink, we have electrolyte add-in drops available for purchase at the studio. It's best to drink electrolyte drinks before, rather than during or after, Bikram yoga. During and after your yoga session, continue to drink plenty of fluids.
2. Keep your toes flat, rather than curled, while standing. This is
especially important during one-leg postures, during which people tend
to curl their toes to maintain balance. If you find yourself reflexively
curling your toes, try spreading your toes instead. This ensures the
development of proper muscle strength, and will help you maintain proper
form.
3. At home, massage the bottom of your feet with a tennis ball. Put the ball on the arch of your foot and roll it from side to side, front to back, and in circular motions. Anywhere you feel a little discomfort, add a little pressure to work the knots out.
4. For a toe stretch exercise for the bottom of the foot:
- Sit in a chair, and extend your leg so that your heel is on the floor.
- With your hand, reach down and pull your big toe up and away from the floor.
- Hold the position for at least 15 to 30 seconds.
- Repeat 2 to 4 times a session, several times a day.
put the ball on the
arch of her foot, roll it around from front to back, side to side, maybe
some circular motions, lateral, wherever you feel knots, roll the ball
over it. If you feel a little bit of uncomofortableness, stop and add a
little pressure. That's going to be key for relieving the knots out of
the foot.
Read more : http://www.ehow.com/video_12286124_avoid-foot-cramping-during-bikram-yoga.html
3. Keep practicing Bikram yoga as often as possible. Foot cramps commonly occur as foot and leg muscles develop the strength
necessary to maintain form. By regularly practicing postures, you
increase muscle memory and help your body gain the muscle strength it
needs to support your weight without cramping.


