Visit our website!

Saturday, November 26, 2016

Tip of the Week: Keep a Nice Tight Grip


"Get a good, tight grip" has got to be one of the most repeated phrases in class. These instructions are not arbitrary. The grip strengthens your hands, flexes the muscles and tendons, and builds power using your hands in every day life. Grip is essential both in order to allow you to correctly perform the postures, and because it directly benefits your fingers, hands, wrists and arms. Next time you're in class, focus on your hands. If necessary, go easy in the postures and concentrate on the placement and motion of your wrists, palms and fingers. Over 25% of our body’s bones are located in our hands. Yoga is a chance to fully engage the complex array of muscles, tendons and ligaments around them, and to reduce inflammation, remove built-up stress and increase range of motion.
 
The standard beginner’s Bikram grip is interlacing your fingers to the webbing, including the thumbs. By applying pressure to your grip through kicking or pulling, you build strength and flexibility in your hands, fingers and wrists. 

We use this first in Pranayama breathing at the start of class, which gives you a chance to get comfortable interlacing your fingers. You want to keep your wrists as straight as possible as you bring your elbows up. 

When doing postures where your arms are over you head with your fingers interlaced, pointer fingers together as in Half Moon and Balancing Stick, your palms should be pressed flat together with your pointer fingers pressed together. Tip: The more you press your palms and fingers together, not only will you be strengthening your hands, but you will also be toning your arms.

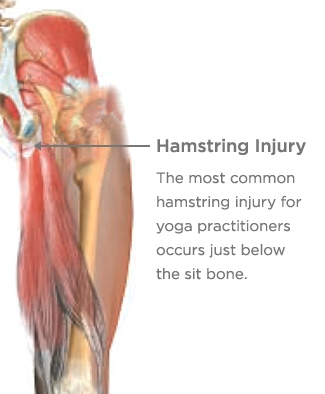
In Hands to Feet Pose, this is where you will hear "Get a nice tight grip. Don't lose your grip!" Pulling is the object of stretching in this pose. If you can keep a tight grip on your heels in this pose, along with Standing Separate Leg Stretching Pose, the more you'll be able to stretch your hamstrings and pull your torso closer to your legs.

Our grip really gets put to the test in Standing Head to Knee Pose. First, you want to wipe your hands to make sure your grip is dry and not slippery. Again, you want to keep your wrists straight to prevent repetitive strain over time. Interlock all 10 fingers for a strong grip so your foot does not slip out of your hands. Tip: You should be using mostly core and leg strength to lift your foot. So much so that if you were to release your hands from under your foot it would remain in the air. Interlacing all your fingers, including thumbs, is recommended. However, if your thumbs will not cross and if/when you are going deeper (actual head to knee), the adjustment is to keep only your 8 fingers interlaced, with your thumbs pressed next to your index fingers. The most important thing is to keep your wrists straight. 

In Standing Bow and Floor Bow Poses, the strength of the posture is more in the kick than in the arm strength, so you actually want to have a lighter grip. Instead of holding on with a tight grip to the feet or ankles, think of yourself as "hanging" from your feet, using your fingers only, and keeping your wrists straight.

In Wind Removing Pose, with your fingers interlaced tightly together, try to not have any space between your palms and the area below your knee.

Placing your palms face-down beneath you in Locust Pose strengthens your wrists, arms and elbows to protect against repetitive strain injuries. 

In Savasana, relaxing your arms and turning your palms to the ceiling promotes the positive flow of energy and receptiveness.

Wednesday, November 16, 2016

Tip of the Week: Prevent Hamstring Injuries

In Bikram yoga we often say to "lock the knee". This does not mean to hyperextend the knee, but to lift the kneecap by engaging your quadriceps and hamstrings. Not only does this give your leg more support to make your standing postures more stable, it also helps to prevent injury to the hamstrings especially when doing forward bends. The following article by Doug Keller for Yoga International discusses ways in which we can prevent hamstring injuries from occurring. 
 
Healing (or Preventing) Hamstring Injuries
 

Yoga students are vulnerable to overstretching the hamstring muscle and tearing the connecting tendon. Follow these tips to avoid—or even heal—hamstring injuries.   


Ask any room of yoga students whether they suffer from pain at one or both of their sit bones, and you can count on a showing of hands. This kind of pain comes from injury to the hamstring attachment. Of course, hamstring injuries are not unique to yoga, though the cause and treatment of this particular problem often is. The more dramatic hamstring tears occur in sports and especially while running, when athletes are tightly wound and move in sudden bursts that wrench and tear at the hamstrings, usually in the “belly,” or middle part, of the muscle. In yoga, the injury occurs in a different way and at a different place.


For people who practice yoga, hamstring injuries develop over time, usually where the hamstring attaches to the sit bone. This is a tendon injury, and unlike a muscle tear, it doesn’t happen suddenly. Instead, it is “death by a thousand cuts”: each tiny rip in the tendon is relatively minor by itself, but because it does not fully heal, repeated injuries accumulate over time, until an ill-considered bit of overstretching or an overly aggressive adjustment from a teacher finally puts the injury over the edge.
Tendon injuries are in a class by themselves. They require a specific regime for healing that is very simple but requires time, patience, and persistence. The alternative, however, is even less attractive. Left alone, an injury to the hamstring attachment can take six months to a year to stop hurting—and even then it does not mean that it has fully healed. The attachment remains far more susceptible to re-injury than a tendon that has been properly treated.


Each little “cut” in the hamstring attachment occurs when the muscle is not engaged and thus cannot protect itself. Immediately after the injury—however tiny it is—adhesive scar tissue forms. While this scar tissue is meant to protect the tendon as it heals, quite often the scar tissue hampers the healing process, preventing a full recovery. Scar tissue limits circulation and stiffens the tendon, leaving it more vulnerable. We tend to dismiss each little injury after enduring some soreness, but the injury is really cumulative. Repeated re-injury and the formation of more scar tissue can extend over years, progressively weakening the tendon.

Learning how to engage the hamstrings is the first step toward preventing a hamstring injury (or healing an injury if it has already occurred).


In yoga, there is ample opportunity for this to happen, usually in the process of doing forward bends. As beginners, we are taught to fold forward at the hip joint (rather than at the waist) with a straight spine, maintaining a natural arch in the lower back through most of a forward bend. Students with tight muscles are rightly encouraged to bend their knees to release their hamstrings somewhat and maintain a flat back as they bend forward. This helps protect the lower back and gives a better stretch to the otherwise hypercontracted hamstrings.


As we get more flexible, we continue the same habit and even overdo it. This is especially true for students who were naturally limber to begin with. The natural arch we sought becomes an exaggerated lumbar curve, and the forward bend becomes more of a swan dive in which the sit bones flip upward as the pelvis tilts forward. Because the hamstrings have learned to release to allow this free fall, they start to act more like bungee cords—relatively slack on the way down through most of the dive, suddenly pulling taut at the far extreme of the bend. Each sharp tug causes a little rip that frays the hamstring where it attaches to the sit bone, because this is the place of the greatest leverage and thus the hardest pull.

We’re taught to engage the quadriceps to protect our knees; indeed, “Lift your kneecaps!” is repeated like a mantra by yoga teachers. But no one tells us to engage the hamstrings to protect them from this injurious yank. Learning how—and how much—to engage the hamstrings is the first step toward preventing this injury or healing the injury if it has already occurred.

The Mechanics of the Hamstring

The most effective strengtheners are simple backbends such as the locust and bridge poses, in which the hamstrings are used to extend the hips. 

We can start by looking at how the hamstrings function. One of their duties is to bend the knee and pull us through our stride as we walk or run, which is why runners typically have such tight hamstrings. The muscle is used in this way when the lower leg moves freely.

But the hamstrings also have a postural function—holding us upright—which works the other end of the muscle, at its origin at the sit bone. The hamstrings anchor the pelvis by drawing the sit bones toward the backs of the legs. If the hamstrings were to completely release their hold at the sit bones, we would flop forward at the hips like a rag doll. The hamstring performs this action when the lower leg is fixed (i.e., not free to move), and for this reason, the hamstrings can get tight simply from standing a lot or doing work that involves bending forward for long periods.


We feel this postural action of the hamstring as a contraction of the tendon where it attaches to the sit bone, at the lower crease of the buttock. At its extreme, this can cause a tucking of the pelvis when the hamstrings are hypercontracted. Good posture comes about through balanced tone between the quadriceps and the hamstrings. Bad posture throws off this balance, causing tightness and chronic hypercontraction either at the front or the back of the hip joint.

Preventing Hamstring Injuries

In a forward bend, this postural action of the hamstring needs to be engaged just enough to protect the muscle from overstretching. If this idea of engaging your hamstrings at your sit bones seems hopelessly abstract, try the following exercise. Stand with your feet separated and slightly bend your knees. Isometrically pull back with one of your feet. You’ll feel your hamstring engage, and your sit bone will want to tuck under somewhat from the contraction at the top of the hamstring. In this case, the hamstring draws or pulls from your sit bone down toward your knee. If you were bending your knee to lift your foot, the direction of energy would instead be from your lower leg toward your sit bone.


For the hamstring attachment to be protected, we want to draw the energy from the sit bone toward the knee, so that the hamstring will act as a brake in the forward bend. This action is of the essence in yoga; it is known as “eccentric” (pronounced “ee–centric”) stretching, meaning that the muscle remains engaged as it is lengthened. For example, if you were to curl a barbell up using your biceps and then very slowly lower it down, extending your arm until it is nearly straight, the lengthening that takes place in the biceps is known as an eccentric stretch—one in which the muscle is both contracted and lengthened at the same time, in measured coordination. This brings greater strength to the muscle in the very process of stretching it. In a forward bend, the hamstring stretches eccentrically, acting as a brake as it lengthens, thus balancing strength and suppleness while sparing the hamstring attachment from injury.

Healthy Hamstrings in Yoga

Let’s apply this technique in a yoga pose. We can take as an example the wide-legged forward bend (prasarita padottanasana). Step your feet apart wide and keep them parallel to each other. While maintaining a straight back, bend forward at your hips to touch the floor. You can bend your knees to protect your back as you fold forward; once in the pose, your legs should be straight unless tightness in your hamstrings makes your back round.


Once in the pose with your legs straight, make sure your knees are not locked or hyperextended. Engage your quadriceps, drawing energy up from your kneecaps toward your hips. You can connect that engagement of the quadriceps to a complementary engagement of your hamstrings: imagine that energy is traveling in a circle down through the backs of your legs. Engage the hamstrings by drawing your sit bones just slightly down toward the backs of your knees, so that the small spaces just beneath your sit bones firm. Your intention to draw your sit bones down will also engage your buttock muscles. You can isometrically drag your feet back to get the action going, though the action is actually initiated from the sit bones turning downward toward the knees. Once you learn the action, you can maintain the balanced engagement between the quadriceps and the hamstrings even as you bend forward in the pose, controlling how quickly and how deeply you move. This same approach can be used in seated forward bends, too: draw your sit bones just slightly toward your knees as you lengthen upward through your spine and fold forward. Applying these techniques will help protect your tendons as you move through the asanas.

How to Heal a Torn Tendon

But what if the damage is already done? How do we heal an injury that has been building up for months or even years? A simple and effective system for healing tendon injuries has been detailed by Dr. Ben Benjamin in a series of articles that appeared in Massage & Bodywork magazine in 2004. As a healing regimen, it addresses two aspects of the injury: the buildup of adhesive scar tissue and the healing of the tendon itself.
The scar tissue can be progressively cleared by a simple massage technique he calls “frictioning.” Its purpose is to break up the irregularly formed scar tissue in order to restore circulation and facilitate the healing process. To friction a tendon, rub or pluck your finger crosswise on the tendon—in one direction only, not back and forth—with a degree of pressure that is enough to be uncomfortable, but not so great as to be painful. Do this for 5 to 15 minutes, taking breaks when your finger gets tired.

Injury is a great teacher, most often arising from patterns and habits of movement developed over long periods of time. Injuries awaken us to these patterns--and to new ways of moving and being within our body.
 
How might you reach the injury to friction it? You can recline on the floor with your knee bent and foot on the floor (or with the calf supported on a chair, so that the leg is at 90 degrees), and thus reach the exposed tendon to friction it with your fingers. It is possible to use substitutes such as a tennis ball or massage ball, reclining with the leg nearly straight and the ball on the tendon. In that case, bend the opposite knee and place your foot on the floor to help you rock your hips from side to side to get the massaging action from the ball. The ball will be less accurate and thus less effective than the finger; the plucking action is preferred.
The second part of the process involves small strengthening exercises, often combined with gentle stretching. The most effective strengtheners are simple backbends such as the locust and bridge poses, in which the hamstrings are used to extend the hips.


For the locust pose (salabhasana), lie on your stomach (with a folded blanket for padding under your hips) and extend your legs behind you, with toes pointed. Work one leg at a time. Rather than simply attempting to lift your leg, which can strain your lower back, work in the following way to concentrate the action in your hamstrings. On the injured side, point your toes and reach back through your big toe as if you were trying to push a button with it. Keep lengthening through your leg and big toe as the way to begin to lift your leg. You’ll feel your hamstring working, particularly beneath your sit bone. You can actively engage the tops of your buttock muscles, lengthening from your waistline toward your tailbone to protect your lower back—but you’ll probably find this happens automatically in this exercise. Your foot needs to only lift four or five inches from the ground; work up to three sets of five or six lifts. You can increase the strengthening action by putting a small weight, such as a small bag of rice, across your ankle. Work both legs to maintain a balance of strength.

For the bridge pose (setu bandhasana), lie on your back with both knees bent, thighs parallel to each other and your feet on the floor. Bring your feet close to your hips so that your shins are perpendicular to the floor. Maintain a natural arch in your lower back, leaving enough room to slip the tips of your fingers into the space just above your waistline. To feel the action of the hamstrings, isometrically pull your feet toward your hips (your feet don’t move) and feel how your hamstrings engage, especially at your sit bones. This exercise alone can be enough if your lower back is tender.

Keeping your weight centered in your heels, lift your hips off the floor. Press your shoulders and upper arms into the floor as well to lift and open your chest, but be careful not to push your head into the floor or tighten your neck in any way. Isometrically pull your feet toward your shoulders just enough to engage your hamstrings; at the same time, engage the tops of your buttocks to draw your tailbone toward your knees. Hold for a few breaths and then release, maintaining a natural arch in your lower back on the way down. Work up to three sets of four or five lifts.


Keep your thighs parallel throughout and avoid pushing excessively through your feet to lift up.
A simple and safe way to stretch the hamstrings in between exercises is to bend one knee slowly toward your chest while reclining on your back, then switch legs.

The program is always completed by applying ice to the injured area for 5 to 10 minutes and then resting it.
In summary, the basic program is:

  1. A gentle warm-up of the hamstring muscle, which can be accomplished by standing (with support) and swinging the leg forward and back like a pendulum;
  2. Frictioning of the injured muscle attachment;
  3. Strengthening exercises, combined with gentle stretches;
  4. Ice and rest.
The key to healing the hamstring attachment is consistency in following this program over several weeks. Work fairly gently and consciously. Sharp or severe pain indicates a more serious tear, requiring rest and medical attention.

Injury is a great teacher, most often arising not from a single miscalculation or moment of abandon, but from patterns and habits of movement developed over long periods of time. Injuries awaken us to these patterns—and to new ways of moving and being within our body. For yoga practitioners, a hamstring injury is a wake-up call that hits us right where we live!

Tuesday, November 8, 2016

Tip of the Week: Don't Get Bored With Your Bikram Yoga Practice


This week's tip is to dive further into your Bikram practice instead of turning away from it due to boredom, thanks to a very insightful blog post by Josh Biro on Nomad Yoga Family. He says to try to find something new, something vulnerable and exciting, something deeper so you don't become complacent in your practice.

Why You're Bored With Your Bikram Practice

I’ve heard that 50% or more marriages in North America end in divorce these days. That seems super effed up to me. Also, I would theorize that more than 50% of yoga practices end in divorce! What I mean to say is – more than 50% of students who practice yoga regularly (3+ times per week) for a year or more eventually quit or significantly reduce their practice. I blame boredom for this. But let me be clear: yoga is not boring; you’re boring!

As Jenna wrote in another yoga blog post, I Fell in Love with Yoga Again in Vancouver, every yoga practice has a honeymoon phase but also runs the risk of falling into the dangerous phase of monotony and boredom. The blooming flower pedals wilt into collapsed muscles and the smiling happy faces turn into somber, slightly annoyed business faces. All too often the solution to these problems from a student is to quit their yoga. It’s like when your 10th grade girlfriend told you: “I love you but I’m just not in love with you.” Ugh!

In the yogaverse the conversation of boredom in yoga is all too common. Amusingly to me, this same conversation happens in every group of yogis from students to studio owners, teachers to desk staff. Student boredom is one of the largest fears of studio owners, yet many of them are guilty of a boring practice themselves. Teachers all too often tell their students to maintain consistency in their practice when they themselves are lazy about getting in the room. And students often cancel their membership, complain of feeling apathetic, or in the worst cases hurt themselves by not paying attention, all due to boredom in the yoga room.

Boredom is contrary to the natural state of growth. In terms of the mind and what makes us human, we’re talking about frontal lobe stimulation. There are multiple ways to stimulate the frontal lobe including repetition, problem solving and emotional response but often our default when searching for stimulation is novelty! In the romantic period of any relationship finding novelty is easy. But as time passes and routine sets in, the excitement of feeling something new dictated simply from the act itself, wears off. Yoga practice is a relationship – a relationship with yourself. In traditional yoga practices, we often do very close to, if not the exact same, routine of asanas every time, the result of which often leads to boredom with our practice. Once you can participate in the entirety of the class, the initial challenge, and therefore stimulation of the practice, is gone. But trust me, there’s more.   

In traditional yoga, beginners practice the same sequence of postures in the same order every time. It’s important to understand that repetition in yoga is pure brilliance. The consistency allows the body and mind to reinforce the aspects of change from the previous classes resulting in a potent accumulation of effects. It allows for the opportunity to discover and know oneself more fully by giving a reference point. Repetition also creates an environment where a student learns more easily and focus on the smallest details. Ultimately, it can become a moving meditation and lead to the practice of both pratyahara (control of the senses) and dharana (cultivation of inner perceptual awareness).

The problem which causes boredom in a yoga practice though, is not the repetitious nature of the practice itself; it’s that the student actually does the same thing every time they practice. The difference between these two things is huge!

The purpose of a Hatha yoga practice is to reveal to you your current human condition, to show you where you may be resisting your own natural state, and to aid in maintaining or returning your body to that natural state. What your yoga practice is not tasked to do is keep you happy, entertain you, or make you feel special or all warm and fuzzy.

The partner in your love relationship is similar. They may choose to do things that make you happy because they love you, but ultimately your happiness is not their responsibility, it’s yours.
Yoga is not boring, you’re boring! Or rather you’re being boring. If you’re bored in the yoga room you must not be paying attention! All students at one point or another fall into autopilot mode. You go in and simply go through the motions. You do the posture the same way you did yesterday and the day before, you do the posture “your way.” You use your injury from 5 years ago, your stiffness, age, weight, hydration level, whatever you can think of as an excuse why your practice is what it is and that’s good enough. Sometimes your body moves through the postures, but your mind wonders about what you’ll make for dinner, how the guy next to you is annoying you, it’s hotter than yesterday, or off in to la la land. You rationalize why you won’t push any further or try the posture in a different way and then come out of class complaining that you’re not getting “enough” from “this” practice or that you’re bored. “I feel like I should just add in some vinyasa right now” or “my chakras need a more yin energy based class” or “can I chew gum in class because I find it moves too slowly for me?”

Being bored in your yoga practice or your relationship is probably an indicator of complacency! This is the natural enemy of curiosity. Curiosity leads to novelty – remember that frontal lobe stimulation? When we get complacent we all too often look outward for a solution, for something new. We blame the things external from ourselves rather than doing the work to go inward and stoke the fire. The essence of real yoga practice is exploration. The difference is that instead of exploring outer space we are exploring inner space. Yoga helps us to go within. Instead of cheating on your spouse, why not turn into the relationship and find something new, something vulnerable and exciting, something deeper? In your yoga practice why not do something different? Hold the posture longer, focus on controlling your breath better, relax more, contract more, go deeper, back off. You could read books on the subject, talk to your teachers, take a seminar, increase your practice frequency, or go on a yoga retreat. Just do something! It’s not just what you do, it’s how you do it, and the intention behind it. You have to be curious about yourself, interested in yourself, be willing to learn about yourself. Here’s the thing though: this will require that you’re not lazy, that you pay attention, that you let go of your self-fear, that you’re honest with yourself, that you take responsibility for yourself, that you love yourself! You have to risk discomfort in order to find new brilliance. But I promise you this – you are way more interesting than you think.  

Wednesday, November 2, 2016

Tip of the Week: Sculpt Your Inner Thighs


One of the lures of Bikram is its body sculpting power; the sustained postures force muscles to contract, developing shape and definition. To sculpt your inner thighs, exercise must engage your adductor muscles. The American Council on Exercise identifies hip adduction as the number one inner-thigh-toning move. You may have heard of hip abduction, which involves lifting the leg away from the body. Hip adduction is just the opposite and calls for squeezing the thighs inward so the inner thigh muscles contract. Several of the 26 postures of Bikram yoga cause the inner thigh muscles to contract, making it an excellent exercise option for obtaining tight inner thighs.

Standing Deep Breathing Exercise and Half Moon Series


  • Whenever you are standing with your feet and legs together, such as in the Standing Breathing Exercise and in the Half Moon series, engage your adductors by imagining you are spiraling your inner thigh muscles towards the front of the room. These postures can be done by just having your feet together without any conscious leg muscle engagement, but you will be gaining much more balance and strength in your adductors if you consciously engage your inner thigh muscles.

Awkward Series

  • The Awkward Series doesn't require much flexibility but you will find that in order to keep from falling over, every muscle in your body, including those inner thigh muscles, must contract. Don’t allow your bent legs to open; keep them hugging in towards the midline to engage your inner thighs.


Eagle

  • This pose automatically engages hip adduction in the top leg crossing over. As you balance your body on one leg while the other leg wraps around the standing leg at the knee, keep squeezing your legs together as tightly as possible. Try to keep your knees centered with the midline of your body, as your inner left thigh squeezes into the inner right thigh.

Standing Bow


  • In Standing Bow you contract your adductors to keep your body pulled to the center, or midline. If you energetically spiral your inner thigh towards the back of the room, this will give you more stability on your standing foot. If you keep engaging the adductors of the kicking leg, this will help to keep your foot centered over the top of your head.

Triangle

  • Triangle causes a stretch on the inner thighs that can be felt immediately. Keep the knee of your bent leg perfectly aligned over the center of your foot (not too far to the left or right). Use your inner thigh muscles to keep your knee from veering outwardly towards your pinky toes. Feel the inner thigh contraction on the straightened leg as well as you keep energetically pulling your inner thighs toward the midline.

Standing Separate Head to Knee


  • As your legs are separated, keep your inner thighs engaged as if your legs were a pair scissors. Keep your adductors engaged throughout the posture, and especially as you come out of the posture, as this will help to stabilize your legs and keep your balance as you lift out of it.

Toe Stand

  • To maintain the stance of the body being balanced on the toes of one foot while in a crossed legged position, all of the muscles of the body are engaged. Crossing the legs especially contracts and works the inner thigh muscles.


Bow Pose

  • Use your adductors to keep your inner thighs pulled towards the center of your body, and to keep your knees from splaying out to the sides.

Head to Knee with Stretching

  • This is the final posture that applies direct pressure to the inner thighs. As the foot of the bended knee is placed against the opposing thigh, push your foot into your thigh, and your thigh into your foot. As you reach your upper body towards the toes, the thigh muscle of the outstretched leg will get stretched and toned.