There are so many great benefits to Awkward Pose. Toned and shapely legs, relief from rheumatism and arthritis in the legs, aligned skeletal system, sciatica relief, flexibility in the toes and ankles, and relief from menstrual cramping!
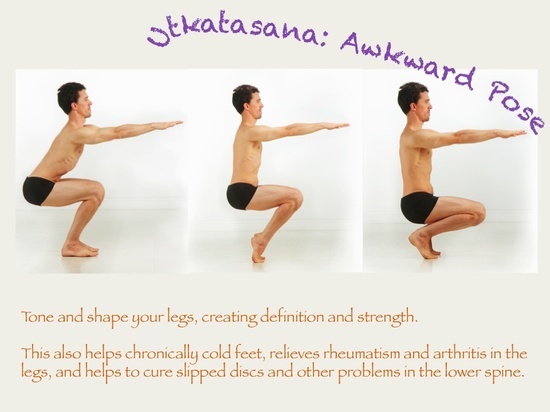
There are three parts to Utkatasana, or Awkard Pose. Today we'll be exploring the first part.
Separate your feet so they are shoulder-width apart or about 6 inches between them. (The best way to measure this is to bend
down with both fists side-by-side between your feet.)
Throughout the posture, your heels stay behind the toes invisible
in the front mirror. Heels do not turn in or out but remain in perfect
alignment, so they make a perfect "number 11".
Extend your arms out and hold them up shoulder height for the
duration of the pose, never dropping them. Engage your triceps as hard as you can as you straighten your arms out in front of you,
extending from your shoulders to the tips of your fingers.
Breathe out on
the way down and in on the way up.
Exhale and lower your hips, bending the knees forward, until your thighs
are just up from parallel. Your pelvis should be positioned in line
with your heels and about 2 inches higher than your knees.
Maintaining a straight back and keeping the abdominals tight, begin to sit deep, bending the knees as if you're going to sit in a
chair directly behind you. Push your booty back, waaaay back. Imagine you're going to fall backwards. Push your heels into the ground while keeping your toes on the ground.
Roll your shoulders back and lift your ribcage, keeping your sternum straight and perpendicular to the floor until your chest is open. Make sure that when you lift your ribcage that it is just a lift, not a push forward with a lift.
Straighten your neck, balancing your head evenly between your shoulders,
until your chin is parallel with the floor. Throughout the entire posture, keep your eyes fixed in the mirror. Don't even blink your eyes or you may lose your balance.
*Check back next week for the 2nd part of Awkward pose!
We've heard many people ask, "Is it safe to do yoga with my knee problems?"

Whether the knees are arthritic or injured, Bikram yoga will definitely
help. Bikram Choudhury actually healed his knee, which was crushed by a 300 pound
weight, with his guru's help doing yoga. You must move the knees to get
circulation to them, and Bikram's yoga helps you do both.
Make sure to listen carefully to the alignment instructions in each
posture. When you are told to keep your feet parallel in standing
postures, please do so. A half inch in either direction away from
parallel has its effects all the way up the knees and into the hips.
In standing balancing postures, it is also important to keep the
standing foot straight and the standing knee pointing straight ahead. If
your knee bows back (hyperextension) you should bring the weight
forwards towards the toes so as to engage the quadriceps muscle ("lock
the knee") and lift the kneecap upwards. This action brings the leg into
one line and brings true strength to the knees.
When you are bending your knees in any of the standing postures, keep
the knees pointed over the toes. This will ensure that the knees and
hips are strengthened evenly inside and out.
In triangle, when you are told to push your hips forward as you bend
your front knee, this will keep your hip in line with your knee in line
with your foot. This is also good for even strengthening of hip and knee
joints.
In some of the standing postures, it might be very difficult to bend
your knee to a 90 degree angle. So do the best you can without creating
pain. Better to keep proper alignment bending 1% than to go 100% in poor alignment.
In the floor poses (fixed firm, half tortoise and rabbit), it might be
difficult for you to bend your knees enough that the hips sit on the
heels. To test your knee flexibility, keep lots of weight in your hands
and bend the knees gradually to the point (but not past) of pain. You
must be able to relax and breathe in the posture, holding it steady, for
anything to happen. As the pain decreases and you start feeling more
comfortable, you can gradually take the weight out of your hands and
allow more pressure on the knees. Eventually you'll be able to go all
the way into the posture, and you won't even remember the time when you
couldn't even sit down!
Benefits :
- Wind-Removing Pose compresses and massages the ascending colon and descending colon.
- It also messages the transverse colon and compresses the entire digestive system.
- It strengthens the arms, prevents flatulence, improves hip flexibility, and firms the abdomen and thighs.
Tips:
- Keep your elbows close to the body.
- Fully interlace the fingers all the way to the webbing and take hold of the raised leg two inches below the knee.
- Keep pulling to your same shoulder until you feel a pinch in your hip joint.
- Keep both of your shoulders all the way on the floor.
- When you are pulling in both of your knees look down through the diamond that is created between your arms and legs.
- If you can't reach both of your elbows when pulling on both of your knees, keep trying! One day you will be able to grab both elbows.
- If your arms keep slipping when grabbing both elbows, imagine that you are trying to push your knees down towards your buttocks. If you are trying to pull your knees up towards your face, your arms are likely to slip.
- Try not to wear body lotion before class. It can really make postures more difficult by causing your grip to be slippery.