Visit our website!

Wednesday, January 29, 2014

Tip of the Week: Love Your Body!

This week's tip is something so simple, and yet for a lot of us is the biggest struggle with our practice. And that is to appreciate and love our bodies. Love every small accomplishment we make, and love wherever we are right here and now.  It's so easy to find faults and have goals to work on, but what's more important is to realize the small changes our bodies and minds make each time we practice. Whatever shape you're in, however flexible you are...love your body and where you are in your practice. Your body and practice might not be exactly where you want it to be "yet", but appreciate all that you have and can do "now". 

The following story is beyond inspirational and admirable of a woman who has been practicing Bikram for the last 9 months. Her blog "Confessions of a Hawaiian Princess: One Woman's Journey to Greater Health" can be found by clicking (here).


This Wednesday will mark the nine month anniversary of the day I started Bikram. Nine months usually signifies the birth of a some thing. In my case, in this case it’s the realization that I’m capable of making the choice, of taking action to create change and work toward the body I want to have.
I sat down last night to write in my journal thoughts I have about my body in this moment, in this now. I’m tired of feeling my stomach resting on my thighs when I sit down. Mind you it used to be worse when I was heavier, but still…..it’s a feeling I don’t like. I’ve written a bit lately on my facebook page about taking action to change that, but I woke up this morning with the idea that I’d detail my efforts.
By actively and consciously thinking about the movements and efforts I’m undergoing to activate my core and shrink my abdomen, I can track my progress, and that’s one of the best ways of feeling better about myself—seeing ALL KINDS of progress.

I’m focusing here on some of the poses of the standing series in the Bikram sequence. Some day when time allows I’ll do an entry on all the poses. I’ve included pics, but please bear in mind that I’ve used my camera with a 10 second timer so the poses aren’t my full expression. I have attempted in each pic to be consciously activating my core.
Everything comes from the breath.

Pose 1: Standing Deep Breathing
Here I’m making an effort to keep my core activated when I inhale AND exhale. This is something I’ve had to work toward. I didn’t always have the abdominal strength to keep my core activated while exhaling. I know when I first tried it I would hold my breath when I exhaled. Now I BREATHE while keeping my core tightened!


Pose 2: Half-Moon
It’s one thing to bend sideward. It’s another to activate my core and bend from there. When I first started doing the yoga I’m not sure I fully grasped how to move from my core, but, as hard as it is, I feel stronger for moving from my core.


Pose 3: Awkward
Oy. It’s my nemesis, this one, BUT when I pull in my core while I squat I can FEEL my abdomen lift off my thighs and that’s a pretty cool feeling!


Pose 4: Eagle
When I pull in my core here I can bend my standing leg deeper, and I FEEL a greater sense of balance. The more balance I feel on the mat, the more I feel it OFF the mat!


Pose 5: Standing Forehead to Knee
Another nemesis! Here I’ve discovered a trick: when I activate my core AND lift my abdomen with my hands I can lift my leg higher, which strengthens my leg and trains my abdomen that it’s NOT the boss of THIS BODY!!!


Pose 6: Standing Bow Pulling Pose
No pic here! And this one I’m having lots of trouble with. I don’t feel like I’m coming from my core. I feel like I’m just doing all I can to stay upright.

Pose 7: Standing Separate Leg Stretch
When I don’t go down with my core here, I’ve noticed I feel it in my lower back and NOT in a good way! I’m finding I do feel like my torso is longer when I go down in this one.  It’s not about how far I go—it’s about moving my body in a healthy manner so it can reach further than where it’s been.


Pose 8: Triangle
Here’s the thing with triangle. Here’s the thing with my real desire to focus on my core, my alignment. I don’t want to waddle! It’s true! When I was not in shape, when I was not active I WADDLED.  I didn’t like it. It’s one of the main reasons I LOVE yoga so much. The deeper my practice goes, the less I waddle, the more my body is in alignment. When I take pictures these days, for the most part my feet are aligned, instead of torqued!  When I hike, my feet point straight ahead. So when I do triangle, I look to feel that I have engaged my core and that my back is in alignment. I can go deeper into triangle when I’m not in alignment but that defeats the purpose.


Pose 9: Standing Separate Leg Head-to-knee pose
Same as above basically. It’s easy to bend over. It’s work to move with the breath, but I’m worth IT!!!


Pose 10: Toe-Stand
I can now work on an adapted version of this pose! This helps me see my progress!  And that’s pretty cool!


I want a better life. I don’t mean for that to sound sad. It’s not. I feel so so very grateful for all the wonderful people, places, things that are in my life. I’m very lucky in that regard, and I know it. Working out is hard work. Yoga is hard work. I can sit here and whine and bemoan that I don’t like parts of my body, including my abdomen, or I can celebrate where I am and all the hard work I did to get here, because if I can get here, imagine where I’ll be in a few months!

It’s not that I spend every moment of every class consciously thinking about activating my core or thinking that I wish my abdomen was smaller. I don’t. But I do concentrate on getting into a pose to maximize the benefits and once I’m in the pose I allow my self, my body to be, to explore the depths it’s reaching.

But it’s not just my body, it’s my mind. My ability to express my self here is a direct reflection of my mental growth, a direct reflection that I feel less shame about my body than I used to. I accept my self, this body more. And when I look in the mirror, in class or out of class I have different level of appreciation. I’m not saying my thoughts are always positive, but I’m in such a better place than I was last week, last month, last year.

I may not know where I’m going these days, but I know when I get there I’ll stand tall, with my feet, my back, and my heart in alignment with the universe! 

As I inserted these pics into this post, I could feel my body go into shock. I can’t explain it. It’s one thing to do yoga. It’s one thing to take pics, but to look at the pics is something else. It’s very difficult for me to be this vulnerable. It cuts to my core (no pun intended), but honesty is and has been a corner stone of this journey I’m on. 

There’s nothing wrong with this body. But I can work on making it better in body, mind and soul. That’s what I want. That’s what I deserve. That’s what I’m working toward. 
(And when time allows I’m going to take much better pics–with a smile and a tiara!)

Wednesday, January 22, 2014

Tip of the Week: Balancing Your Electrolytes

Electrolytes (we talk about them a lot as Bikram Yogis!) are equally as important as staying hydrated with water. It is important to know that when we sweat you lose electrolytes and losing these minerals can greatly effect how you feel in the hot room and outside the hot room. If you are low on electrolytes before class you can become slightly deficient during or after class. Below is a list of important electrolytes to pay attention to:
  • Calcium – aids muscle contraction

  • Magnesium – aids healthy cell function

  • Potassium – helps regulate pH balance

  • Phosphate – helps regulate pH balance
  • Sodium – regulates amount of water in the body


Electrolytes help regulate the fluid balance in your body and, when present in proper amounts, ensure that your muscle fibers contract efficiently and powerfully during exercise. They also help regulate your blood pressure, blood pH and nerve function. If your electrolytes are out of balance, you may experience symptoms such as muscle cramps, twitching, heart palpitations and weakness. Sodium and potassium are the electrolytes most subject to imbalance as a result of sweating during intense exercise.

The following information on electrolytes is from Bikram Yoga Albuquerque. Their website can be found by clicking (here).


Electrolytes

Most people think of a sweaty athlete drinking a colored sports drink when they hear the word electrolyte. On the contrary, there are many ways to get fresh natural electrolyte replenishment from foods such as oranges, coconuts and honey, plus, save a few dollars by preparing your own sports drink that your body will embrace.

Water

Water is the main ingredient as it will act as the primary carrier of the electrolytes. It must be as clean as possible to work optimally. If you do not have the luxury of a home bottled water dispenser, simply boil water in a tea kettle. Incidentally, distilled water--the captured vapor from boiling water--is the best. It is very close to pure water, having almost all trace elements such as minerals, pollutants and other contaminants, removed. If you want distilled water, it's best to purchase it because collecting the vapor is difficult to do at home. Sometimes you can ask your bottled water carrier if they offer distilled water instead of spring. Tap water should be your last resort.

Salt

Electrolytes are basically salts. Salts keep your body's electrically conductive to maintain cell voltage for receiving or passing along information. Regular table salt works fine as long as it contains sodium chloride, which almost all salts are made of. Some also have potassium iodide, which is also excellent for your cocktail. If you can locate fine grain salt, it dissolves much faster. Using a mortar and pestle on regular salt work just as well.

Citrus

Oranges, grapefruits, tangerine, lemons and limes--try to always have these on hand as they are the best ingredients for electrolyte replenishment. Oranges are a particularly good choice. This is why you may have seen many athletes gorging themselves on juicy slices. Citrus fruits are great, even alone, for electrolytes. However, adding some other ingredients can enhance the effect. 

Containers and Recipes

When you make your electrolyte drink, make sure that you're using a container that you like to travel with. If you like your container it will increase the chances that you will indulge in your drink concoction more often.

The Lip Twister - tart and sweet

  • 1/4 cup of lemon juice
  • 1/4 cup of lime juice
  • 1 teaspoon of salt
  • 1 whole squeezed orange (or one frozen can of orange juice)
  • 1 liter of water

Easy Sweet - not too sugary

  • 2 cups of coconut milk
  • 1 teaspoon of salt
  • 1 teaspoon of Stevia (natural sweetener) or honey
  • 1 liter of water

Mix It Up - use a blender

  • 2 bananas
  • 3 cups of coconut milk or 2 cups of strawberries
  • 1 cup of water and ice
  • 1 teaspoon of salt
  • Juice of 1/2 of a lemon

Fast and Dirty #1 - bare bones approach

  • 2 lemon halves squeezed into a glass
  • 2 orange halves added
  • Squirt of honey
  • Four shakes of salt
  • Fill the glass with water and gulp down

Fast and Dirty #2

  • 1 bottle or can of V8 vegetable juice (any flavor)
  • 1 cup of water
  • 1 cup of orange juice

Foods

In addition to making your own electrolyte drink there are many foods that will help with replenishment as well. These include: avocados, broccoli, yogurt, tofu and apricots.

Wednesday, January 8, 2014

Tip of the Week: How to Have a Successful 30 Day Challenge

Are you ready to start your New Years Resolutions? Ready to transform your life and your body? Make a commitment to make yourself the healthiest you can be. Take the 30-day challenge for a new body and a new positive attitude. Find unhealthy habits and attitudes replaced with new healthy ones. We will support you every step of the way through this exciting life changing process. This is one of the most rewarding fulfilling gifts you will ever give yourself—and the lives of those that are touched by you! 


What is the 30 Day Challenge? 


Challenge yourself with our ongoing “30 Day Bikram Challenge” by completing 30 classes in 30 days. Experience for yourself the amazing physical, mental and physiological benefits of a daily practice! 

Challenge Rules 


Participate in a yoga class at least six (preferably seven) days each week for 30 days. (If you need a day off each week, make up with a double class the following day.)

If you practice at another studio, please bring proof of your practicing there. 

Have Fun! 

Remember, when you sign up to do the challenge, you are making a commitment to yourself. Keep the commitment and see the difference it will make in your life! You may even want to keep a daily journal during the challenge, noting you observations. 

Not sure you can do it? Enroll your family, friends, and other yoga students to support you in your challenge. 


To Sign up for the Challenge: 

Talk with an instructor.
Pay the $20.00 registration fee. (In addition to class fees.)
Record your name and date on the challenge card.
Track your progress by using the stickers on the card. (Please remember to sign in)
At the end of your successful challenge, you will receive a special challenge t-shirt. Your name will also be placed on the website and published in the newsletter. 

Some Tips for Completing the Challenge:

Hydrate, Hydrate, Hydrate. We can’t say this enough! Make sure you drink plenty of water during the day, before and after your class. If you are drinking enough water out of class, you may not even need any during your Bikram yoga class. This sounds extreme in 105ºF heat, but the best Bikram yogis drink very little during class – this makes for a more focused practice and better access to your abdominal muscles because you don’t have all that water sloshing around hindering your movement.

Start Healthy. Make sure you are in reasonably healthy condition before you undertake a 30-day challenge. If you have any serious health concerns please see your doctor. However, you can also give the challenge a go and see how you feel – you may be stronger than you think, and might just surprise yourself!

Pace Yourself. Probably the most important piece of advice. Take each day as it comes without any expectations. Some days you will fly through a class, other days it will feel like you’re pushing a boulder up hill – this is all part of the process.

Vary your position in the room. We all get attached to our own favourite spot in the room. If you love the front row, challenge yourself but putting yourself at the back. And if you’ve never been in the front row, give it a try and see how it feels.

Know your Body. If you are feeling exhausted from a day at work, don’t push yourself too hard. Have a ‘relaxation’ yoga class where you position yourself in the back row – it’s okay to take it easy every now and then, and like Bikram Choudhury says, “Don’t try hard, try easy.”

Eat Healthy, Eat Strong. As you progress into your challenge you will gain greater mind/body awareness to the point where you’ll become extremely aware of what foods will help you get through the 30 days. Foods that won’t help you are of course the ‘bad’ foods such as white sugars, excessive wheat-based foods and too much dairy. Foods that will help you are: fresh vegetables and fruit, complex carbohydrates like whole grains, and because you are building new muscle tone, you may find that you need extra amounts of protein in particular. If you are vegetarian or vegan  make sure you eat more beans, tofu and nuts to compensate. You may even want to add in a Vitamin B12 supplement.

Friday, January 3, 2014

Tip of the Week: Rabbit Pose

It's been a while since we've discussed Rabbit pose, so today we are going to revisit this stimulating and spine opening pose. You can read our last discussion about Rabbit pose by clicking (here). 

Bikram Yoga SLC instructor Naomi Franchetti at the 2011 National Championships.

Rabbit pose is one of the most challenging postures to master in the Bikram Yoga series. This is a posture where it is especially important to pay attention to the dialogue.

Always start with the right grip in the pose. The thumbs should be included with the rest of the fingers, thumbs on the outside, fingers on the inside.

As you exhale, lower your chin to your chest, round your shoulders away from your ears, and tighten your abs. Imagine rounding your spine as much as Naomi is in the above photo.

Curl forward until your forehead touches your knees and the top of your head touches the floor. Very little weight or pressure should be on the head. Only about 15% of the body weight should be in the head. The rest of the weight is in your arms pulling on your heels.


The dialogue will always encourage to lift the hips up, which is important to the pose. But it is important to never sacrifice the grip to get the hips higher. Remember,it is the grip and pull that create the force to stretch the spine.

The harder you pull on the feet the better of a compression you will create benefiting the organs.

Wednesday, December 18, 2013

Tip of the Week: Practicing While Pregnant

As soon as you know you are pregnant please seek the advice of your doctor and follow advice accordingly.

  • For a first time pregnancy, it's better to avoid any new form of exercise. 
  • If you are a regular Bikram Yoga practitioner for more than a year, you can continue your practice following Rajashree's Pregnancy Yoga.
  • The series was made into a DVD video specifically for pregnancy by Rajashree (Bikram’s wife) which is available for purchase in our retail section.
  • You can practice Rajashree’s Pregnancy Yoga after the 1st Trimester. 
  • Rajashree's Pregnancy Yoga can be practiced in Bikram Yoga Class with moderate heat at own discretion.
  • If you are a student (including teacher) and are at a High Risk, follow your doctor's advice.
 
Kate Ulrich in 3rd part of half moon 
No postures should be done which cause compression on the diaphragm and heart.

In backbends, don't push hips forward of knees.

In backbends, stretch upward and back with the upper spine; when coming up
bend the knees to relieve back pressure.

Moderate heat is okay from the beginning. Separate feet slightly in standing poses.
 
Kate Reese in Seated Forward Bend  In forward bends keep knees open.

No head to knee pose, separate leg forehead to knee, or rabbit.

Also no cobra, locust, full locust, bow.

Rest on your side in between postures rather than on your back.

Long, deep, slow breathing in easy sitting position is relaxing for mom and baby.
 
Practice at about 50% of your capacity and never to exhaustion.
• Be sure to stay well-hydrated.
• Practice in a cooler area of the room or by the door. Feel free to leave class anytime to cool down.
• From the second trimester on, practice standing postures with your feet six inches apart for stability.
• No forward compressions or belly-down postures after the first trimester. Ask your teacher for modifications
.

Wednesday, December 11, 2013

Tip of the Week: Boost Your Libido!

By P.J. Stuart from Bikram Yoga AZ

 
Yoga...Nature's Viagra!

Va-va voom! Nothing fuels your body quite like Bikram Yoga does. Know what I mean? It’s no urban legend or old wives’ tale.  If you’ve been practicing for a while – you already know it, first hand.  Your whole system is working better. You love it … and so does your mate. Yeah … I see that smile.
“Whatever are you talking about, PJ?” you ask, innocently.  (Mm-hmm).
 
I’m talking about all that nitric oxide coursing through your veins, of course.

Ahem.  When this powerful gas molecule is released into your bloodstream, it relaxes the blood vessels, expands the capillaries and increases circulation. (See where I’m going?  Gentlemen, start your engines.)

Fortunately, for those of us who practice Bikram Yoga, there is ample opportunity to produce nitric oxide during class.  Going through the 26 postures of the Bikram series, we activate muscles in every part of the body. As with any type of exercise, those muscles demand oxygen, supplied by the blood.  In order to send blood to those areas more easily, when the need arises, nitric oxide is then released from the lining of the arteries.  Presto.

Some scientists call nitric oxide “the hero of human biology.” By dilating the artery walls, it enables blood to travel faster through the body.  One popular metaphor physicians may use is that of a fire hose.  As water rushes through it to put out a fire – the hose needs to expand enough to handle the pressure, still keeping enough force to put out the fire.
Thank you, nitric oxide, for treating our circulatory system the same way!

You can imagine – during a 90-minute Bikram class, as we send blood to all areas of the body, we produce a lot of nitric oxide.  This is what makes Savasana so delicious and restorative.  And in the bedroom, it’s what …  Well, you know the rest.  I won’t use adjectives there, but they’re good ones too.

I don’t want to get in any trouble with the pharmaceutical geniuses who decided to put the power of nitric oxide into a pill … but … wouldn’t you rather get your dose of Viagra the natural way?  Avoid the need for it all together?
That’s right … see you in class!

Wednesday, December 4, 2013

Tip of the Week: Be on Time to Class

 
Do your best to arrive to class with enough time to check in, change, lay down your mat and towel, and maybe even rest in savasana before the class begins. It's a much nicer way to begin your practice with a calm, clear mind than with a rushed and frazzled one.

If you do need to come a little late and enter the room in the middle of the first breathing exercise, just throw your mat and down without rolling and straightening them out so you can get right into the exercise. It's so important to at least get a few deep breaths in before you start the postures. 

If you come really late and the class has already completed the Standing Deep Breathing, most teachers will not allow you into the class. If you are allowed to enter, be sure to do a few deep breathing exercises on your own first even if the class has moved on to the first posture.

The golden rule of being on time is most important for newbies. Try to get there at least 30 minutes early to give yourself plenty of time to sign up, get dressed, settle down on your mat, and acclimate to the heat. Take a minute to introduce yourself to the teacher and let her or him know if you have any injuries that you're working through, so that she or he can guide you through the postures without exacerbating any issues.

Wednesday, November 27, 2013

Tip of the Week: Avoid Your Cell Phone After Class


It's so tempting to grab your cell phone right after class. But you’ve just spent 90 minutes cleansing your body and mind, enjoy it. All day we’re attached to our electronics, computers, phones, Twitter, texts and email. Enjoy the peace of mind you’ve cultivated. Think of all the gifts you have in life, and all that you are thankful for. Let this be your goal for next class, and try not to look at your phone until you're back home.

Thursday, November 21, 2013

Tip of the Week for Tight Hamstrings


It doesn’t add up at first, but focusing on executing really good sit ups can really increase your hamstring flexibility. In postures like Standing Head to Knee and Standing Bow you might struggle with getting past your tight legs. By focusing on the pull and stretch at the end of each sit up, you will gradually open up your hamstrings and the standing postures will become easier. Take an extra moment to get a really good stretch at the end of each sit up. Bonus tip: work really hard in Pada Hasthasana (or Hands to Feet Pose, the first stretching pose in half-moon.)  

Wednesday, November 13, 2013

Tip of the Week: Relax Your Mouth


It's common for many of us when first starting our practice to clench our mouths and tighten our faces as we try to learn the postures. Aggressive or competitive personalities especially tend to have this habit. We can also carry a lot of tension in our jaw muscles from anxiety, stress, and anger which can result in neck and shoulder pain, headaches, tooth pain, damaged tooth enamel, and TMJ syndrome.

Relaxation is hard work, but developing a keen awareness is the first step to overcoming the harmful habit of unconscious clenching of the jaw. Unless you are chewing food, your teeth should never be touching. Try to be aware of this especially during your practice. Keep your lower jaw relaxed as if it was hanging in a sling. Relax your tongue and remove it from the roof of your mouth. Keeping your lips closed, relax your lip muscles and stop making those funny strained faces in the mirror.

You might be surprised that as you focus on relaxing your mouth and jaw, the rest of your body and mind will follow.

Wednesday, November 6, 2013

Tip of the Week: Standing Bow Pulling Pose

  • Be sure to start with the knees touching together to ensure balance.
  • Grab the inside of your ankle with the inside of your elbow facing out.
  • Bring your opposite arm up so that your shoulder is almost touching your chin.
  • Focus on one spot in the mirror, and don't move your eyes off that spot!
  • The standing leg is your foundation. Keep the knee locked with a firm contraction of thigh. If you don't feel that you have the balance to go forward yet, stay in this position until you have a firm foundation.
  • Use your glute muscle to kick all the way up, as you bring your torso down creating a perfect counterbalance. Always remember that, “kicking and stretching are 50/50, equal, simultaneous.” When you increase the force of your kick you must also increase the energy of the arm stretching toward the mirror to maintain your balance.
  • Feel your spine arching backwards as you kick and imagine that you are getting that same "tear drop" arch in your spine as Bow Pose laying on the ground. Even though you are stretching your body forward, you are also pulling your chest upward.
  • Keep your weight toward the front of your foot, watch that the weight does not move into the heel as you initiate your kick. 
  • Bikram’s dialogue says to touch the shoulder to the chin, not chin to the shoulder. Keep your chin lifted and extend the arm forward to bring the shoulder and chin together, helping to promote the proper alignment of the shoulders.
  • Keep your hips square and parallel to the mirror, the same as if you were doing the splits on the floor. Often when people start the kick, their hips get out of alignment which causes them to tip sideways and fall.
  • Don't let your kicking knee swing out to the side. The more you squeeze inner thighs together the more you can prevent this from happening.
  • Make sure you are breathing. When you inhale, try to lengthen the body and when you exhale try to go deeper into the posture.
  • Ideally your stomach, abdomen and chest are parallel to the floor, with both shoulders in one line from the side and both legs in one line like standing split. 
  • If you fall, good! Get back in again! The more you practice, the better you will become.
  • Remember that often it is our minds that give up before our bodies do.

Thursday, October 31, 2013

Tip of the Week: Yoga for Happiness

You likely already know that yoga is the secret to happiness. But the following article by Angela Pirisi titled "Yogis Score High on Happiness" in Yoga Journal provides some interesting studies and great reminders to continue with your yoga practice for life-long happiness.


No matter how much we lust after worldly objects and material pleasures, in the end, we all just want to be happy. But despite our efforts, happiness often eludes us. Now the ranks of science have stepped in to help unravel the secrets of this precious state of being. And they're discovering what yogis have known all along.

Happiness, it seems, has a biological component. Groundbreaking studies conducted by University of Wisconsin psychologist Richard Davidson over the past decade have shown that people who report high rates of happy feelings have a larger and more active left prefrontal cortex than their depressed counterparts. Other studies have concluded that happiness may be a matter of genetics. A 1996 study of 1,500 pairs of twins at the University of Minnesota found that, on a self-report happiness scale, adult twins were highly matched in their scores despite variations in income, marital status, and education. 

Happiness also seems to lie outside the limits of material wealth and life events. Winning the lottery may tip the emotional scales at first, but most people return to a certain grade of happiness within three months. This is nothing new to the practitioners of yoga. As Dr. R.M. Matthijs Cornelissen of the Sri Aurobindo Ashram in Pondicherry, India, explains, "In the Vedic tradition, ananda, or delight, is seen as being present in the essence of everything that exists. Happiness is thus not something that depends on what you have, but what you are." 

In fact, many studies suggest that yoga can effect positive states of mind, despite life's highs and lows. In 1993, a British team measured the effects of three relaxation techniques: chair sitting, visualization, and yoga and found that yoga resulted in the greatest increase in alertness, mental and physical energy, and lust for life. Likewise, a 1994 German study, which compared a group of women practicing hatha yoga to a second group that did not, found that the yoginis showed markedly higher scores in life satisfaction, and lower scores in aggressiveness, emotionality, and sleep problems.
"Yoga primarily changes your consciousness, which includes your way of looking at things," says Cornelissen. "In the process, many aspects of your physical functioning also change, including your brain chemistry." 

Whether we use yoga or some other self-affirming behavior, it's clear that even born-to-be-negative types can choose to cultivate happiness. Just as a bad mood can become a bad habit that perpetuates unhappiness, so can nurturing positive feelings lead to a more permanent positive state of mind.

Wednesday, October 23, 2013

Tip of the Week: Get a Flat Stomach with Bikram Yoga


The belly is a prized area of the body for many men and women. When fat appears for various reasons, people are often led to exercise as a means to get rid of it.

Spot reduction of problem areas doesn't exist; if you only perform exercises that strengthen certain anatomical areas, you won't reduce abdominal fat. You need to eat healthy foods and perform regular aerobic exercise to lose all-over body fat. Performing the entire Bikram series will offer the overall health benefits this style of yoga provides with consistent practice, including a toned midsection.

One question that we often get from both new and old students alike is “Where are the abdominals in Bikram yoga?” It’s going to be different for each person and you certainly have to exert the effort and do the proper form to work the core (in any exercise – even crunches!). Regardless of the posture you perform, you should always engage your abdominals! What you’ll find is that Bikram is a nearly 90 minute ab workout!
  • Pranayama: in breathing, the stomach should be sucked in on both the inhale and the exhale; core strength is used to push the air out of the lungs and keeping the stomach in on the inhale helps the lungs work harder to fill, increasing your lung capacity.
  • Half moon: Half Moon pose strengthens all of the core muscles located in the abdomen and the sides of the torso and releases energy from the spine to prepare you for the rest of the Bikram series. Half Moon pose is the first pose of the Bikram series and is particularly beneficial for strengthening the abs. The first part of the pose prepares you for the backbend in the second half, which mimics the gut-busting reverse crunch, one of the top exercises used to tone the belly. With regular practice as part of a whole-body workout, expect the Half Moon to tighten your lower abs, waistline, buttocks and thighs.
  • Awkward: four times in this posture (in parts 1 and 3), the dialogue says something to the effect of “suck it in.” When you’re sucking it in that hard and trying to keep a straight spine, you can’t help but do some work in the abdominal muscles!
  • Eagle: twice here the “suck it in” revisits. Right before you sit and at the end of the posture.
  • Standing Head to Knee: another forward bend so definitely suck the stomach in before rounding down to grab your foot. Another benefit – the tighter you suck your stomach in, the easier it feels to tighten up your glute muscles and leg muscles.
  • Standing Bow: opens the diaphragm and lungs to improve circulation. When you properly engage your abs, this ordinarily difficult pose becomes easier; however, it may take several tries before you can balance successfully. When practiced regularly, this pose firms the abdominal walls, helping tone the upper and lower abdominals as part of a full-body workout.
  • Balancing Stick: every single muscle should be contracted in this posture, including the abdominal muscles!
  • Standing Separate Leg Stretching and Standing Separate Leg Head to Knee are both forward bends so suck the stomach to the spine as you go into them and then challenge yourself to keep it held in the whole time. The constant trying to keep it in is a great ab workout.
  • Triangle: trims the waistline as you use your abs and constantly lift from the lower belly.
  • Toe Stand: forward bend! Suck it in!
  • The Situp: need I say more? Ok, keeping the heels on the floor helps the situp work more of the lower abdominals as well
  • Spine Strengthening Postures: We tend to let our bellies relax in most of these and focus on our spine. But a strong spine must be balanced with a strong core. Cobra, Locust, Full-Locust, and Bow are just the poses to tone your entire midsection. And remember that a "tight body is a light body". The more you tighten your core, the easier it will be to lift off the ground.
  • Half-Tortoise: Oh yah, this is where it’s at. The whole way into and out of this posture, when you’re slowly lowering your body down or slowly bringing it back up with a straight spine, the core muscles should be working HARD.
  • Rabbit: the extra dialogue in this one definitely calls for sucking it in and depressing the abdominal wall (also another forward bend).
  • Separate Leg with Stretching: a forward bend where you curve your spine; sucking the stomach in on this one really helps you get your head closer to your stomach (more compression = more medical benefit!).
  • Spine Twisting: the more you suck your stomach in, the easier it will be to twist.
  • Blowing in Firm: the dialogue clearly states that this one is good for the abdominal muscles. You should even feel a little cramping in the abs as you do this one from using them to quickly blow the air out of the lungs.


Wednesday, October 16, 2013

Tip of the Week: Let Go of the Things that No Longer Serve You


Are you holding on to things that no longer serve you? Ideas, expectations, desires, bad habits, false beliefs, unhealthy relationships, old injuries, judgements about your ability, self doubt? Many of these things carry over into your Bikram practice and hold you back from your true potential. The person who walked into the yoga studio today is not the same person who walked in yesterday. Every day, every moment presents an opportunity to create ourselves anew, to shrug off the baggage of the past, open ourselves up to the possibility of the moment and take action to create an incredible future. 

Are the things you're doing in your life making you healthier, stronger, happier and more powerful? Believe in yourself. Believe that holding on does nothing in fact but hold you back from becoming your best self. The following is an email we received from one of our students Sara Rodriguez who has learned the lesson of letting go. Sara is a regular student who recently had to take some time off from practicing due to some injuries from ballet dancing.


"I have every intention of getting back into the hot room as soon as possible. I can't even explain how difficult it has been to be away from all of you, to feel so separated from the practice that I have come to love as the better part of me. It's been a tough mental and emotional adjustment more than anything, as Bikram Yoga SLC has become my happy place--your beautiful studio full of such beautiful people showed me how to let go of everything that happens externally, for the internal journey is all that really is. I was able to take that from the hot room to the rest of my life, and it changed me for the better. I have struggled for the past month with not being able to fulfill that desire for inner peace through my physical practice. Even more so, I miss the energy at Bikram Yoga SLC--the way that each of you has a sincere love and appreciation for every person who walks through your doors inspires me on so many levels. This positive energy gives me the beautiful change of pace that I crave every day.


We all have a story; I truly believe that every one of us has this element of our past that comes with us wherever we go from there. Bikram has helped me learn how to channel that energy into something positive, no matter how negative the past may have seemed when it was the present. It has given me the hope that is vital to turning things around, the notion that one really never is too broken to begin again and discover the deepest potential for beauty. We can acknowledge the past, take it for what it is, and let go of the parts that don't serve us--that's what I am still trying to do every time I practice: do I really need to hold onto that muscle to achieve this asana? What can I let go to make this pose exactly what I need it to be? These questions apply in every situation: do I really need to hold onto that feeling or that event to be better, or will letting it go give me more room to grow?

As for my story, this is only another beginning. There are no ends, really. You are so right--this balance is the beauty of bikram, playing between holding on and letting go, because that's life."

Wednesday, October 9, 2013

Tip of the Week: 50 Awesome Flavored Water Ideas

As Bikram yogis we know that we should be drinking water frequently throughout the day to stay hydrated during our practice. The following are some awesome ideas from 52kitchenadventures.com for flavoring your water if you need a little tasty alternative to unhealthy sugary drinks.


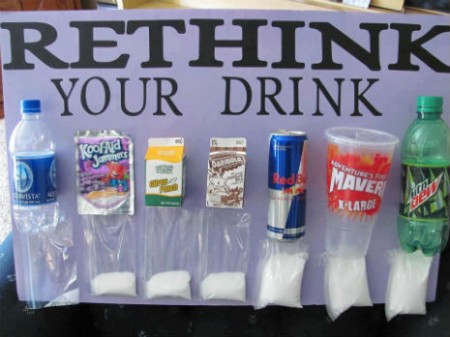
The Health Education Council has launched the Rethink Your Drink campaign. They are encouraging healthy drink choices, like replacing sugar-sweetened beverages (think soda, sports drinks, and energy drinks) with water. Their goal is to read 8,000 pledges by the end of September.

As someone who constantly carries around a water bottle, I am on board with this campaign and immediately pledged to drink water instead of sugary drinks for the next 30 days. I know that for most other people, this would be a tough challenge. Many people drink soda everyday, or don’t think twice about picking up a Red Bull or a mocha. It’s shocking how much sugar is in pretty much any drink you can get at Starbucks. I don’t want to spoil your annual pumpkin spice latte, but seriously check it out and think about making it homemade or opting for water instead.


I came across this eye-opening photo online. I think it’s particularly important to watch what our children are drinking and eating. Do they need all that sugar in sweetened chocolate milk or soda? Instead, let’s encourage them to have water.

I know, I know. Water is boring. I hear people say that all the time. Well, not anymore! You can add tons of different fruits, veggies, and herbs to make water taste better. Fill up a pitcher, toss in some combination from below, and let it sit in the fridge for a few hours (the longer you let it steep, the more flavor you’ll get, but you can also enjoy it immediately).

Without further ado, 50 awesome flavored water ideas. I hope this gets you thinking outside the box and trying out more water.

    1. Watermelon
    2. Cucumber
    3. Lemon
    4. Cantaloupe
    5. Orange
    6. Cherries
    7. Lime
    8. Grapefruit
    9. Basil
    10. Mint
    11. Grapes
    12. Blood orange
    13. Rosemary
    14. Lavender
    15. Strawberries
    16. Blackberries
    17. Raspberries
    18. Pineapple
    19. Kiwi
    20. Papaya
    21. Honeydew melon
    22. Fresh ginger root
    23. Mango                                                                                       And don’t forget fun combinations of the ingredients above! Get creative and combine them so it never gets dull. The possibilities are endless but here are some of my favorites:
    24. Watermelon and mint (pictured above)
    25. Cucumber and mint
    26. Lemon and mint
    27. Cherry and lime
    28. Watermelon and cucumber
    29. Ginger and lemon
    30. Orange and pineapple
    31. Lemon and lavender
    32. Lime and mint
    33. Cucumber and lime
    34. Lemon and basil
    35. Strawberry and mint
    36. Blackberry and ginger
    37. Lemon and blueberry
    38. Thyme and blackberries
    39. Cucumber and rosemary
    40. Cantaloupe and watermelon
    41. Cucumber, lemon, and mint
    42. Lemon and lime
    43. Strawberry and basil
    44. Cranberry juice and lemon (use a capful of unsweetened cranberry juice)
    45. Ginger and lime
    46. Pineapple and mango
    47. Strawberries and lime
    48. Orange, lime, and lemon
    49. Lemon and a pinch of cayenne
    50. Papaya and mango

…and I could keep going. Seriously, there are so many potential combos!
For the herbs, crush or chop them up to get the best flavor. Similarly, squeeze citrus wedges, slice or cube melons, and crush berries.